Hello Guest User,

Please feel free to have a look around the forum but be aware that as an unregistered guest you can't see all of it and you can't post.

To access these 'Registered Users Only' areas simply register and login.

Q's Z900 A4

Work in Progress

Moderators: chrisu, paul doran, Taffus, KeithZ1R

Message
Author
User avatar
Richard Q
100Club
100Club
Posts: 492
Joined: 24th Feb 2014
Location: Sheffield
Contact:

#16 PostAuthor: Richard Q » Fri Oct 10, 2014 8:35 am

The PO told me that he had fitted new pistons & rings when he first bought it, but had done in excess of 20K afterwards.

PO wrote: Kawasaki z900 A4, 1976. This bike is a US import and is basically a z900 A4 with a Z1 style paintjob, Z1B badges and a rear disc hub and swinging arm fitted. I bought the bike in 2003 whereupon I put new pistons and rings in her (barrels are still standard 66mm bore) and replaced the output shaft bearing. I have covered in excess of 20,000 miles since, having used this as my main bike during the summer. As would be expected for a bike of this age and mileage the engine shows some signs of wear and there is some misting from the exhaust on the overrun and from the breather when fully at temperature (see video - http://www.youtube.com/watch?v=FMyXYrPAOpQ) and is at the stage where it may benefit from a rebore+pistons+rings or at least new rings.


Hence the reason the engine is coming to bits :) and to get rid of that black paint of course.
Somewhere, over a rainbow, weigh a pie.

1976 KZ900

User avatar
Richard Q
100Club
100Club
Posts: 492
Joined: 24th Feb 2014
Location: Sheffield
Contact:

#17 PostAuthor: Richard Q » Tue Oct 21, 2014 10:34 am

All in bits, just need to tidy up a bit :)

Image

This is what the remains of the centre stand look like - also note that the battery box is the wrong one and has been welded in at the rear - and not very well. I am assuming that it needed to be fitted to make way for the brake master cylinder :?:

Image

Some of the indentations in the head are quite deep, but I have taken it to a machine shop this morning and they say they can fix it. :D

Image

And they can fix this as well - looked like a crack to me, but I am assured it is just a deep scratch.

Image

They did however point out that two of the valves were a little too short. They sit lower than the valve spring retainer. The tappet is therefore acting directly onto the retainer and not the valve.
Somewhere, over a rainbow, weigh a pie.


1976 KZ900

User avatar
Richard Q
100Club
100Club
Posts: 492
Joined: 24th Feb 2014
Location: Sheffield
Contact:

#18 PostAuthor: Richard Q » Sun Nov 09, 2014 10:44 am

Stripped the motor and got the outside bits over to Manchester for a depaint, and a sisal polish :)

Image

I did however manage to snap a bolt off though :twisted:

Image

I am going to rebuild the motor with stainless bolts but have been advised against using stainless on the crankcase halves as they are not as strong as the originals.

Anyone got on of these I can exchange for beer tickets? It's a 92003-113 - M6 x 116mm with a flanged hex head.

Richard
Somewhere, over a rainbow, weigh a pie.


1976 KZ900

freddyz1r
ZedHead
ZedHead
Posts: 1187
Joined: 10th Mar 2013
Location: mansfield,nottinghamshire

#19 PostAuthor: freddyz1r » Sun Nov 09, 2014 10:56 am

Hi richard, I'll have a look 4 you tomorrow. I'll probably have one :?: I'll give u a call tomorrow afternoon :up
cheerz freddy :D
Punctuation, Spelling and Grammar will be used sparingly. Due to rising costs of inflation.

It's not me who can't keep a secret. It's the people I tell that can't.

freddyz1r
PUM 329

User avatar
Richard Q
100Club
100Club
Posts: 492
Joined: 24th Feb 2014
Location: Sheffield
Contact:

#20 PostAuthor: Richard Q » Sun Nov 09, 2014 11:27 am

Cheers Freddy, appreciate it :)

Richard
Somewhere, over a rainbow, weigh a pie.


1976 KZ900

User avatar
Richard Q
100Club
100Club
Posts: 492
Joined: 24th Feb 2014
Location: Sheffield
Contact:

#21 PostAuthor: Richard Q » Thu Nov 13, 2014 12:49 pm

After careful consideration, I thought I would have the frame and various other bits, powder coated.

Image

So phoned a company who had done some work for me before and discussed it with them on Monday. Then phoned yesterday to ensure I had everything correct, they were going to strip it first, let me have it back to repair, then powder coat it when done.

Phoned today - three times now - to check they were in so I could drop the frame in and choose a colour/shade (50 shades of black!!). No problem, drop it down I was told.

Got there and the place was abandoned. They moved two weeks ago to the other side of Sheffield :roll:

You would have thought that they could have mentioned this FFS.

:twisted:
Somewhere, over a rainbow, weigh a pie.


1976 KZ900

User avatar
Ginger Bear
Hardcore
Hardcore
Posts: 5512
Joined: 16th Dec 2008
Location: In the Dark.
Contact:

#22 PostAuthor: Ginger Bear » Thu Nov 13, 2014 1:47 pm

I'm looking forward to seeing the finish on those cases. :up :up
Image

# 104

Phil Churchett Award Winner 2011 & 2016 :D
Buzzworkz Best Modified Zed 2016

needaz1100r
ZedHead
ZedHead
Posts: 1128
Joined: 11th Sep 2012
Location: Reading
Contact:

#23 PostAuthor: needaz1100r » Thu Nov 13, 2014 2:28 pm

They did however point out that two of the valves were a little too short. They sit lower than the valve spring retainer. The tappet is therefore acting directly onto the retainer and not the valve.[/quote]

THAT is an absolute disaster waiting to happen, anyone who builds an engine and doesn't spot this and do something about it, really should find something to do other than build engines.
Cheers,

Mark.

User avatar
Richard Q
100Club
100Club
Posts: 492
Joined: 24th Feb 2014
Location: Sheffield
Contact:

#24 PostAuthor: Richard Q » Mon Nov 17, 2014 12:46 pm

needaz1100r wrote:
richard Q wrote:They did however point out that two of the valves were a little too short. They sit lower than the valve spring retainer. The tappet is therefore acting directly onto the retainer and not the valve.


THAT is an absolute disaster waiting to happen, anyone who builds an engine and doesn't spot this and do something about it, really should find something to do other than build engines.


Indeed :shock: It may explain the dents and damage on the head, and also the small lump of metal, which looks like a piece of piston ring, in the sump.

Richard
Somewhere, over a rainbow, weigh a pie.


1976 KZ900

User avatar
Richard Q
100Club
100Club
Posts: 492
Joined: 24th Feb 2014
Location: Sheffield
Contact:

#25 PostAuthor: Richard Q » Sat Nov 22, 2014 4:47 pm

Bits are back, wallet suitably lightened :shock:

Image

Problem is, two of them are broken i.e. have cracks in them which go right through. The points cover and the chain cover. After checking the pictures I took prior to sending them out, I discovered they were already broken :evil:

This getting expensive real fast :)

Never mind, these parts are looking very nice indeed. Not perfect, but when they are in the bike, I am sure it will look better than new.

Richard
Somewhere, over a rainbow, weigh a pie.


1976 KZ900

User avatar
Ginger Bear
Hardcore
Hardcore
Posts: 5512
Joined: 16th Dec 2008
Location: In the Dark.
Contact:

#26 PostAuthor: Ginger Bear » Sat Nov 22, 2014 6:25 pm

I have a powdercoated chain/sprocket cover that was sent to me a while back by Compo Z1R for my current project. I now plan to use an outrigger bearing, so I'll happily pass it on if you can use it?
Image


# 104


Phil Churchett Award Winner 2011 & 2016 :D

Buzzworkz Best Modified Zed 2016

User avatar
Richard Q
100Club
100Club
Posts: 492
Joined: 24th Feb 2014
Location: Sheffield
Contact:

#27 PostAuthor: Richard Q » Sun Nov 23, 2014 4:01 pm

Ginger Bear wrote:I have a powdercoated chain/sprocket cover that was sent to me a while back by Compo Z1R for my current project. I now plan to use an outrigger bearing, so I'll happily pass it on if you can use it?


Thanks for the offer GB, but there's no need to be honest. The crack is hardly noticeable, just annoying that I paid to have it polished, only to find it afterwards :evil: I'll still use it as it matches all the other panels now its all shiny.

Image

Image

I have found a new points cap for £27.00 so happy with that, :)
Somewhere, over a rainbow, weigh a pie.


1976 KZ900

User avatar
Richard Q
100Club
100Club
Posts: 492
Joined: 24th Feb 2014
Location: Sheffield
Contact:

#28 PostAuthor: Richard Q » Mon Dec 01, 2014 11:02 am

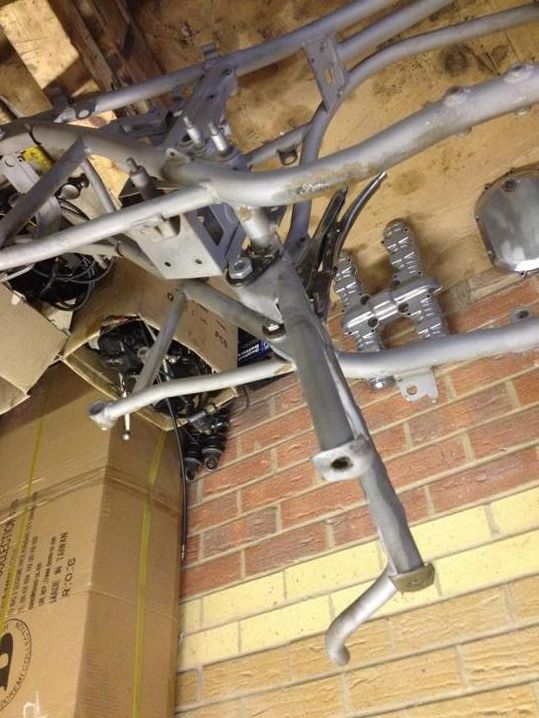
Stand clamped on and in the right place

Image

Ready to weld up and send back to the powder coaters

Image

Bit of a job getting that in the right place :?? but there now. Battery box was welded in, so that's now been removed. Plenty on dents and bits twisted and bent, all beaten back into place with a large ball peen persuader.

Engine wise, the crankcases are back together. Sump is now back on with some nice shiny stainless bolts, although not in this pic :oops:

Image

Barrels and head look awesome :shock:

Image

Richard
Somewhere, over a rainbow, weigh a pie.


1976 KZ900

User avatar
Richard Q
100Club
100Club
Posts: 492
Joined: 24th Feb 2014
Location: Sheffield
Contact:

#29 PostAuthor: Richard Q » Sat Dec 13, 2014 12:59 pm

Powder coating boys have discovered what 'satin' means, and the frame is back :D

Image

Centre stand is on for the first time since I have owned the bike, and I have tapped the head stock bearing races in - so much easier if you chuck them in the freezer for an hour, then forget and leave them overnight :shock:

Now, the stem itself has a shim/washer, then a rubber grease/dust seal and the main cone of the bearing. But there is no 'shoulder' for the rubber to fit into the bearing.

So do I drift the bearing down until it touches the rubber? (doesn't sound right),

or drift it right down and flatten the seal? (doesn't sound right either)

or stretch the seal over the bearing like below? then carefully drift it on until the bearing touches the shim.

Image

The rubber was flattened on one side when I took it apart and really didn't seem to be doing anything.
Somewhere, over a rainbow, weigh a pie.


1976 KZ900

User avatar
Richard Q
100Club
100Club
Posts: 492
Joined: 24th Feb 2014
Location: Sheffield
Contact:

#30 PostAuthor: Richard Q » Sat Dec 13, 2014 4:13 pm

Engine's back in; phew, that thing's piggin' heavy :shock:

Image
Somewhere, over a rainbow, weigh a pie.


1976 KZ900


Return to “Projects”

Who is online

Users browsing this forum: No registered users and 28 guests