Hello Guest User,

Please feel free to have a look around the forum but be aware that as an unregistered guest you can't see all of it and you can't post.

To access these 'Registered Users Only' areas simply register and login.

My Ultimate Zed

Work in Progress

Moderators: chrisu, paul doran, Taffus, KeithZ1R

Message
Author
freddyz1r
ZedHead
ZedHead
Posts: 1187
Joined: 10th Mar 2013
Location: mansfield,nottinghamshire

#16 PostAuthor: freddyz1r » Sun Oct 12, 2014 8:40 am

Looks great zomerset zed :up
(Have you already finished the bike :?: or have you caught up now :?: )
Freddy :D
Punctuation, Spelling and Grammar will be used sparingly. Due to rising costs of inflation.

It's not me who can't keep a secret. It's the people I tell that can't.

freddyz1r
PUM 329

User avatar
Ginger Bear
Hardcore
Hardcore
Posts: 5512
Joined: 16th Dec 2008
Location: In the Dark.
Contact:

#17 PostAuthor: Ginger Bear » Sun Oct 12, 2014 8:59 am

This is looking good. One to follow for sure.

With reference to cracks in the cylinder head, they're pretty common on pots 2 & 3. Might be worth spending a bit on the head you have rather than looking for another head. Although they do come up on ebay from time to time, I doubt you'll find anything that won't need any work.

If you need somewhere localish try these;

https://plus.google.com/116107655534140 ... l=uk&hl=en

Otherwise there's SEP in Kegworth that many have used or Debben that have probably forgotten more about zeds than any of us have ever known.
Image

# 104

Phil Churchett Award Winner 2011 & 2016 :D
Buzzworkz Best Modified Zed 2016

User avatar
Zomerset Zed
100Club
100Club
Posts: 239
Joined: 30th May 2014
Location: Somerset

#18 PostAuthor: Zomerset Zed » Sun Oct 12, 2014 10:00 am

My bad - didn't notice the rear footrest hangers - only saw the seat Embarassed


The seat is definitely going, anyone want it?....no I didn't think so :oops:

This is a great project thread, 180/190 rear tyre with 530 chain
will be just enough clearance for the frame, (in case you
didn't already know). Looking forward to more updates of
your perfect Zed Thumbsup

630 will work with a 180 tyre + 5/8" offset drive sprox


Thanks for the info guys! More to come on the chain run in the next few posts.

(Have you already finished the bike Question or have you caught up now Question )


Bike doesn't look much different to this now, but a lot of design going into the swingarm/shocks and chain run. Will update with more photos soon :)

Padders
Hardcore
Hardcore
Posts: 3043
Joined: 15th Jan 2006
Location: Grimsby Lincolnshire

#19 PostAuthor: Padders » Sun Oct 12, 2014 11:58 am

Liking the way this bike is going mate keep the photo's coming.
PUM 13

User avatar
Zomerset Zed
100Club
100Club
Posts: 239
Joined: 30th May 2014
Location: Somerset

Cylinder head

#20 PostAuthor: Zomerset Zed » Sun Oct 12, 2014 4:43 pm

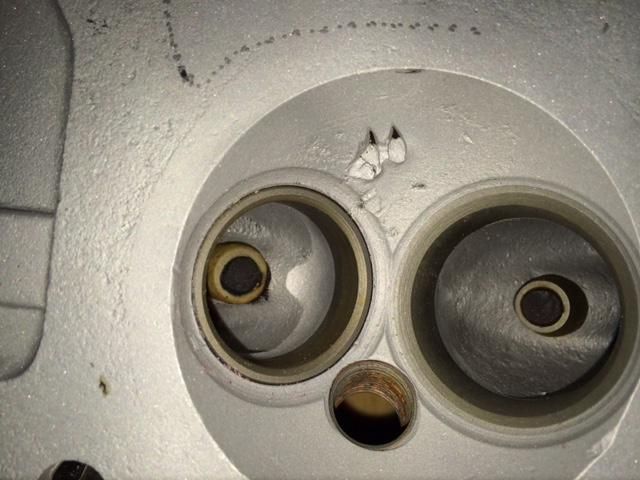
The head which came with the bike had the following damage. Unfortunately I only discovered most of the damage once I had spent a few hours blasting all the paint off:

Crack on no.2 goes halfway down plug thread. Thread is also in a bad way:
[img][img]http://i28.photobucket.com/albums/c207/mikeandbron2012/IMG_0152_zps1fbfeb7e.jpg[/img][/img]
no.4 has the errant ring damage and a crusty old thread insert:
[/img]Image[img]
[/img]
no.3 has a fairly large crack and munted thread:
[img][img]http://i28.photobucket.com/albums/c207/mikeandbron2012/IMG_0150_zps4489aabb.jpg[/img][/img]
Between n0.3 and n0.4 we have this bizzare anomaly! The damage is actually what seems to be in the shape of a gasket. It is not superficial damage, but goes right into the surface of the head. What is difficult to see in the photos is that you can follow the track marks down into the stud hole. I spent a while blasting this area to see if it would clean up better to no avail:
[img][img]http://i28.photobucket.com/albums/c207/mikeandbron2012/IMG_0151_zps94a73130.jpg[/img][/img]
Some other engineers I have shown the head to reckon it may be a welded repair but I am far from convinced. Why this shape and position? The marks do look like it could be pourous weld but it just doesn't make any sense to me. The only thing I can think of is the head has been on an engine for a while with a gasket well out of position and this is the result of a lot of corrosion that has oxidized the ally in the pattern of the gasket where moisture has been retained.
Anyone else got any ideas :?: :?:

Anyway, mostly due to this and all the other little bits of damage to the head, plus broken find and exhaust stud bosses, I decided to look for another head :(

So I put the call out on this fine forum for a new head and z1000puddin came to the rescue (thanks Stu). Even better we could do a contra-deal :wink:

So here's the puddin-head all blasted:

[img][img]http://i28.photobucket.com/albums/c207/mikeandbron2012/IMG_0111_zps7e47a206.jpg[/img][/img]
[img][img]http://i28.photobucket.com/albums/c207/mikeandbron2012/IMG_0107_zpsb0f91768.jpg[/img][/img]
[img][img]http://i28.photobucket.com/albums/c207/mikeandbron2012/IMG_0110_zps8044152a.jpg[/img][/img]
[img][img]http://i28.photobucket.com/albums/c207/mikeandbron2012/IMG_0105_zps37fd098f.jpg[/img][/img]
[img][img]http://i28.photobucket.com/albums/c207/mikeandbron2012/IMG_0106_zpsa66166d4.jpg[/img][/img]
The head is in much better nick overall with just a couple of crack on no.2 and 3 and a couple of exhaust stud bosses needing repair. Overall :D

The only small negative is that its a US head so has the external castings for the exhaust port air injection, but they a still solid cast ally, no ducts

If you need somewhere localish try these;

https://plus.google.com/116107655534140 ... l=uk&hl=en

Otherwise there's SEP in Kegworth that many have used or Debben that have probably forgotten more about zeds than any of us have ever known.


Thanks for the contact Ginger Bear. Has anyone used these guys for stud boss damage :?: and does anyone bother getting the cc cracks welded :?:

Thanks for any advice :D
Last edited by Zomerset Zed on Sun Oct 12, 2014 5:46 pm, edited 3 times in total.

User avatar
Jay1969
Hardcore
Hardcore
Posts: 2891
Joined: 26th Feb 2013
Location: East Midlands, England.
Contact:

#21 PostAuthor: Jay1969 » Sun Oct 12, 2014 5:29 pm

PM sent Re: 1015cc head

User avatar
Zomerset Zed
100Club
100Club
Posts: 239
Joined: 30th May 2014
Location: Somerset

#22 PostAuthor: Zomerset Zed » Sun Oct 12, 2014 5:32 pm

Sorry Jay, I am editing as posting and now have replacement head, perhaps I could have 3?

User avatar
Jay1969
Hardcore
Hardcore
Posts: 2891
Joined: 26th Feb 2013
Location: East Midlands, England.
Contact:

#23 PostAuthor: Jay1969 » Sun Oct 12, 2014 5:49 pm

Oh ok Zomerset Zed

User avatar
Zomerset Zed
100Club
100Club
Posts: 239
Joined: 30th May 2014
Location: Somerset

Progress

#24 PostAuthor: Zomerset Zed » Mon Oct 13, 2014 5:50 pm

Vapour blasted engine fitted loosely in frame so I can line up chain and sprockets and rear wheel:

[img][img]http://i28.photobucket.com/albums/c207/mikeandbron2012/IMG_0113_zpsa09dc62e.jpg[/img][/img]


[img][img]http://i28.photobucket.com/albums/c207/mikeandbron2012/IMG_0146_zps0cd97b71.jpg[/img][/img]

Swingarm bushed up and fitted sans caps and shims. Opted to fit solid bushes, so turned down some Oilite bushes and pressed in. I am not a fan of using needle bearings on swingarm pivots due to the bruising that can happen on the spindle sleeve due to the bearing oscilating only a few degrees for its life. These bushes can carry huge loads and can be left dry if desired, but I will grease to keep corrosion at bay.

[img][img]http://i28.photobucket.com/albums/c207/mikeandbron2012/IMG_0147_zps992e52e4.jpg[/img][/img]

Plenty of room here:

[img][img]http://i28.photobucket.com/albums/c207/mikeandbron2012/IMG_0114_zps1f96fa23.jpg[/img][/img]

630 sprocket will go to be replaced with an offset item either 520 or 530:

[img][img]http://i28.photobucket.com/albums/c207/mikeandbron2012/IMG_0148_zpsfd40c68c.jpg[/img][/img]

R1 wheel hard up against inside of swingarm. Sprocket studs may have to go to be replaced with low profile head cap head bolts:

[img][img]http://i28.photobucket.com/albums/c207/mikeandbron2012/IMG_0115_zps0ceb7bf7.jpg[/img][/img]

R1 rear caliper just hangin:

[img][img]http://i28.photobucket.com/albums/c207/mikeandbron2012/IMG_0154_zpsd155dc25.jpg[/img][/img]

Not sure if I will use it yet?

User avatar
Ginger Bear
Hardcore
Hardcore
Posts: 5512
Joined: 16th Dec 2008
Location: In the Dark.
Contact:

#25 PostAuthor: Ginger Bear » Tue Oct 14, 2014 6:52 am

From experience you'll need to machine down the face of the sprocket carrier by something like 8mm to align the chain with a 5/8" offset front sprocket.
That should help with your stud clearance, but as you've already suggested they're best replaced with bolts although they may be difficult to torque up properly if you opt for cap heads.
Image


# 104


Phil Churchett Award Winner 2011 & 2016 :D

Buzzworkz Best Modified Zed 2016

User avatar
Big Fluff
Hardcore
Hardcore
Posts: 2543
Joined: 1st Mar 2007
Location: Marbury, Shropshire

#26 PostAuthor: Big Fluff » Tue Oct 14, 2014 12:33 pm

Great work this, and isn't it so much more fun doing everything yourself.
I had a great time building the ELR Rep http://z1ownersclub.co.uk/forum/viewtop ... hlight=elr
Unfortunately this years project is a VFR500 :lol:

I found the best way to machine the sprocket face was to make a banana shaped cutting tool. As you have probably guessed, it's damn near impossible to hold the sprocket carrier in a lathe from the cush drive side, so I mounted it in the lathe sprocket carrier face nearest to the chuck and made a long banana shaped cutting tool reach it.

Anyway, good luck and keep us all updated of your progress.

Regards, Will
Kawasaki GPz750T, Kawasaki ZRX1100R, Kawasaki GPZ1000RX, H**** VF1000RG Rothmans, H**** VF500F2F, H**** CB1100RD, Suzuki GSX1100EFE, H**** XL125K2

User avatar
zed1015
Hardcore
Hardcore
Posts: 3810
Joined: 2nd Nov 2005
Location: Somewhere between Scunny and Goole.

#27 PostAuthor: zed1015 » Tue Oct 14, 2014 9:38 pm

Is that R1 wheel a 6 inch rim ?
If so you will need to section the frame around the swingarm pivot by around 12mm and use a 3/4 to 1 inch offset front sprocket to get chain clearance with the wheel true central.

User avatar
Zomerset Zed
100Club
100Club
Posts: 239
Joined: 30th May 2014
Location: Somerset

Chain line

#28 PostAuthor: Zomerset Zed » Wed Oct 15, 2014 6:06 pm

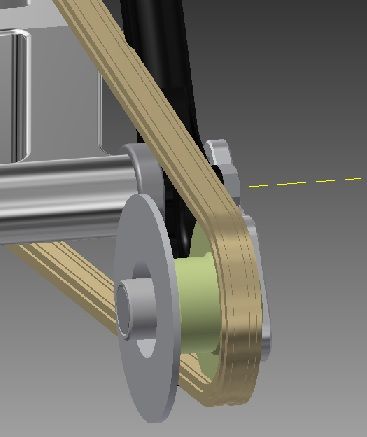
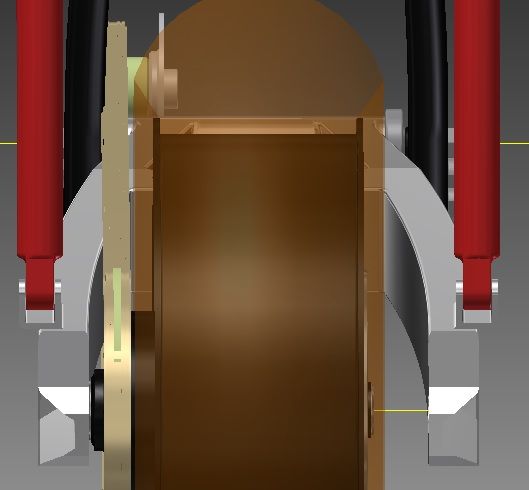
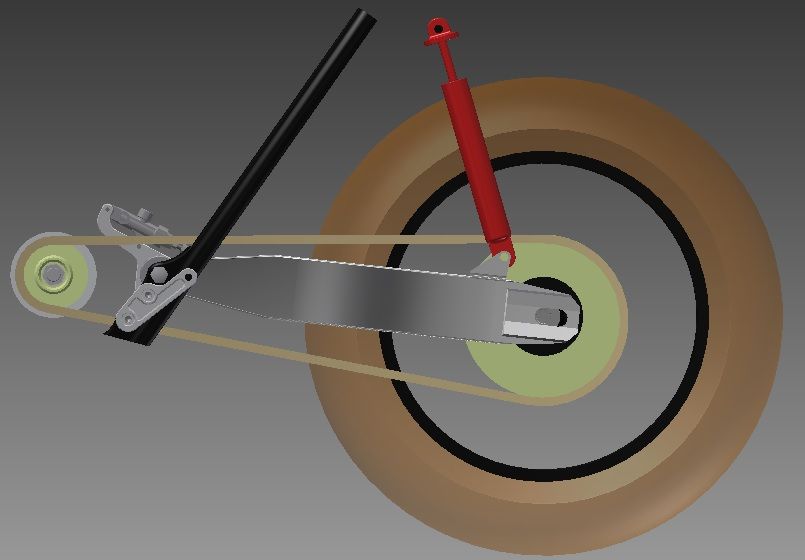
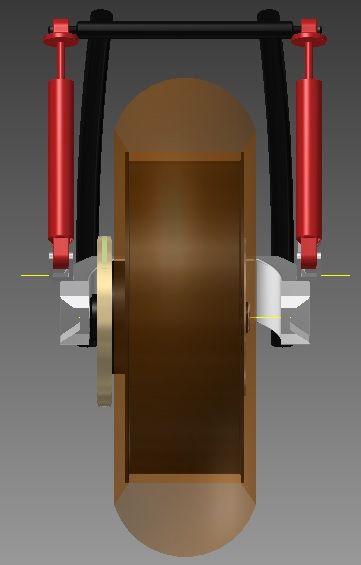
Being an engineer I have modelled in 3D CAD the important parts of the rear end that I need to get right:
Image

Image

This is a crude model of work done so far with the components I have sourced for the bike: XJR1300 swingarm, R1 5VY rear wheel.

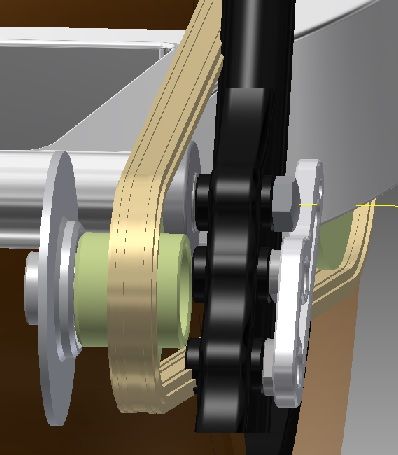
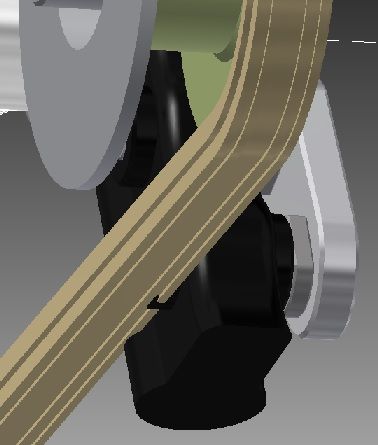
I have modelled a 520 x-ring chain running on a 19T 520 offset sprocket and a 45T 520 rear sprocket. Not sure these are the sizes I will go with yet and may even go to a 530 chain as the 530 chain is only marginally wider overall (length of rivet pins). What I do know is that with this combination and no machining of the sprocket carrier the chain will cut through the frame rails and the lower foot-rest mount boss on the inside of the frame:
Image

Image

Image

Image

The model is fairly accurate (to within 1mm) of reality and calls for a 25mm (1 inch) offset front sprocket, which I have verified with actual measurements I have made with a straight-line mounted off the sprocket carrier running forward to the standard 630 sprocket.

According to the model I only have about 3mm to play with between the inside of the chain and the outermost side of the rear tyre. Of course this is a 200 section slick and I want to fit in a 200 section road tyre, so to be sure, next step is to get a 200 section road tyre fitted as I think this will be a slightly narrower tyre. Then I will need to accurately model the road tyre and see how much I have to play with before I make the decision what size chain I will use. If it all goes tits up I will have to go for a 190 section tyre, but I am pretty determined to get as fat a tyre in there as I can on the 6 inch rim.

We design and make many 1 off sprockets at work, so I intend to do this and also design an outrigger bearing and support plate (drag bike stylee but better) which will also incorporate a clutch cylinder from a modern Jap bike.

So to have Zed 1015 also confirm my virtual findings in the real world with his experience is reassuring and shows he knows his onions, so Cheers for that :D

I think that no matter what I do, I will be attacking the frame with the cut off disc in this area, which Is no surprise really. Making a neat job of the subsequent infill I will need to do, plus any additional bracing and strengthening will have to be done with great care.

More to come......

User avatar
Pigford
I'm on prescription!!
Posts: 10566
Joined: 2nd Jan 2006
Location: Hampshire Coast UK

#29 PostAuthor: Pigford » Wed Oct 15, 2014 6:09 pm

Great project & interesting details, cheers :!:
And on the 7th day... Zeds were created!

User avatar
IanM63
Regular Poster
Posts: 97
Joined: 21st Jun 2012
Location: Sherborne Dorset

#30 PostAuthor: IanM63 » Thu Oct 16, 2014 5:22 pm

Image

This is what Sanctuary do with there frames to accommodate a 6" wheel.
Image


Return to “Projects”

Who is online

Users browsing this forum: No registered users and 87 guests