Page 15 of 20
Re: Z1000J Build
Posted: Tue May 16, 2017 3:45 pm
Author: tlc
Lee.
Yellow can look muddy in low light. Having the bike in a tent for last weekends show under lights proved this.
Red could work well.
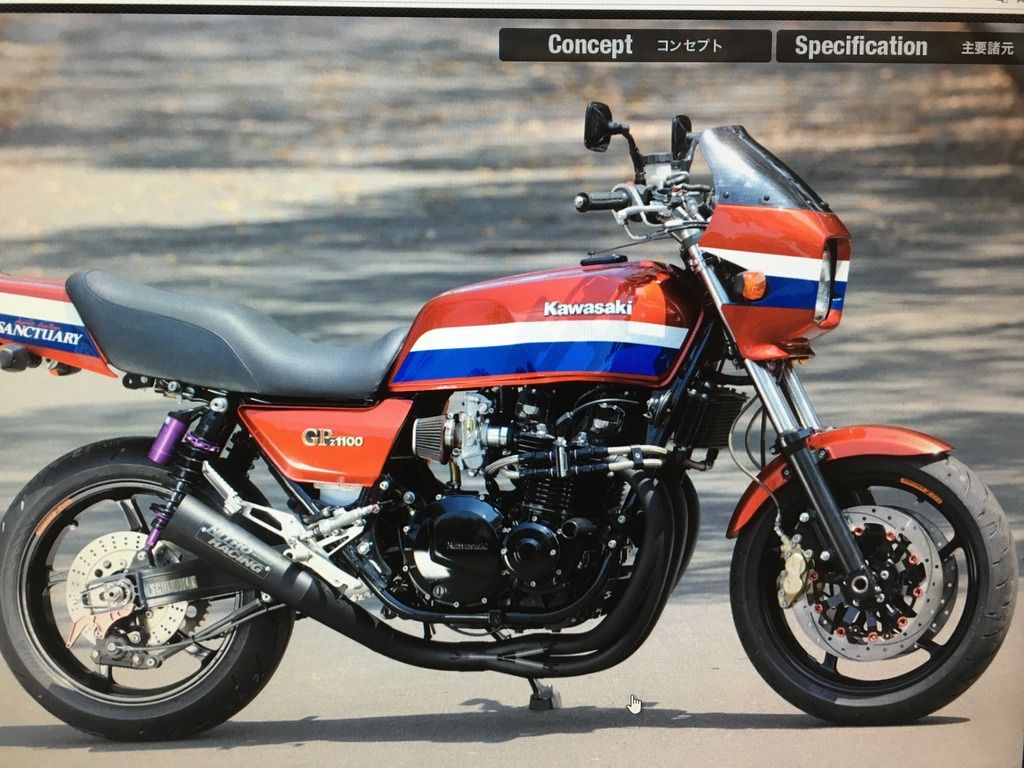
Re: Z1000J Build
Posted: Tue May 16, 2017 6:50 pm
Author: ZedHead
That's a beauty! Not too sure about the purple piggy backs though
Re: Z1000J Build
Posted: Tue May 16, 2017 7:20 pm
Author: LeeJackson
ZedHead wrote:LeeJackson wrote:So I need to step up the pace on this build and get it finished.. Looks like my work is moving me elsewhere.. Where is still TBC! Maybe Sunny Aberdeen which would be not a big deal but could be further afield in which case the J will have to be added to my in storage collection! Ugh..
Do you think it might be ready and in th UK in time for Stafford Lee? If so I have a cunning plan

Dave, I seriously hope so! I was supposed to drop off the bodywork for paint today but got delayed a bit as still messing about with my fairing mountings. Other than that not much more to do other than bits and pieces..
Re: Z1000J Build
Posted: Tue May 16, 2017 7:23 pm
Author: LeeJackson
tlc wrote:Lee.
Yellow can look muddy in low light. Having the bike in a tent for last weekends show under lights proved this.
Red could work well.
Chris
I'm thinking of standard Ruby Red for the J1. It's not so bright but maybe can throw a pearl in it or something... Other thought is to go with a black with some pearl or flake in it to shine a bit..
Re: Z1000J Build
Posted: Wed May 17, 2017 7:46 am
Author: Kwackman
LeeJackson wrote:I'm thinking of standard Ruby Red for the J1
For what it's worth, that gets my vote!
Re: Z1000J Build
Posted: Wed May 17, 2017 7:51 am
Author: LeeJackson
Kwackman wrote:LeeJackson wrote:I'm thinking of standard Ruby Red for the J1
For what it's worth, that gets my vote!
You definatly have a Ruby Red fetish Kwackerman

Re: Z1000J Build
Posted: Wed May 17, 2017 8:09 am
Author: Kwackman
LeeJackson wrote:You definatly have a Ruby Red fetish Kwackerman
You've been looking at my browsing history again, haven't you!
Re: Z1000J Build
Posted: Thu May 18, 2017 12:45 pm
Author: ZedHead
Lee, a few more goodies arrived from Doremi this morning. Just waiting for tank and tail badges to arrive from PMC in the next few days and I will ship it over. Hope to get some time to get the brake brackets done in the next week.
Re: Z1000J Build
Posted: Thu May 18, 2017 7:04 pm
Author: LeeJackson
ZedHead wrote:Lee, a few more goodies arrived from Doremi this morning. Just waiting for tank and tail badges to arrive from PMC in the next few days and I will ship it over. Hope to get some time to get the brake brackets done in the next week.
Spot on Dave cheers! Hoping to get paint underway next week too.
Re: Z1000J Build
Posted: Sat May 20, 2017 11:28 am
Author: LeeJackson
So finally got round to fitting my catch tank. I may change the 8UN fitting for an angled one to tidy it up and not sure on the final resting point for breather filter yet but we will see..
Re: Z1000J Build
Posted: Sat May 20, 2017 11:45 am
Author: LeeJackson
Also mocked up the fairing and seems a few issues. Headlight is too close to the forks so dragging everything back. The ones I got were 105mm offset. Does anyone know what the standard headlight for the R is offset at? Ie how long do my headlight brackets need to be?
Also is a bit too low I reckon, but damn ignition barrel is so big it can't go any further up.. Will have to rethink that a little.
Re: Z1000J Build
Posted: Sat May 20, 2017 11:58 am
Author: tlc
One of the most complicated parts of my build was the headlight bracket. In the end I cut out the headlamp bowl to accommodate the ignition switch.
As I made my fairing brackets I could adjust that to suit but I would suggest you fit the bottom fairing bracket without the headlamp then make the top brackets and get the fairing to line up.
You can then fit the headlamp to suit that.
The Sanctuary bike I based mine on uses a frame mounted headlamp and fairing and after all the trials I had with mine I can sort of see why.
Re: Z1000J Build
Posted: Sat May 20, 2017 12:03 pm
Author: ZedHead
That's a petty about the head light brackets Lee. Good news is I will be shipping your screen among the other bits and bobs on Monday so at least you can try it for size.
Re: Z1000J Build
Posted: Sat May 20, 2017 1:09 pm
Author: LeeJackson
tlc wrote:One of the most complicated parts of my build was the headlight bracket. In the end I cut out the headlamp bowl to accommodate the ignition switch.
As I made my fairing brackets I could adjust that to suit but I would suggest you fit the bottom fairing bracket without the headlamp then make the top brackets and get the fairing to line up.
You can then fit the headlamp to suit that.
The Sanctuary bike I based mine on uses a frame mounted headlamp and fairing and after all the trials I had with mine I can sort of see why.
Chris, I am using the headlight to mount the bottom of the fairing as per the standard mounts, so it's kinda limiting what I can move. I'm waiting in some rubbers etc for the headlight as everything is loosely fitted just now, once I have all that firmed up will see where it end sitting. I think I will have to do the same with the headlight bowl too, unless I can get a shallow switch, but seems easier to cut the bowl.
Cheers
Lee
Re: Z1000J Build
Posted: Sat May 20, 2017 1:10 pm
Author: LeeJackson
ZedHead wrote:That's a petty about the head light brackets Lee. Good news is I will be shipping your screen among the other bits and bobs on Monday so at least you can try it for size.
Good stuff Dave, it's coming on now. Tomorrow I'll get the tank drained and will drop everything off for paint next week.
