Hello Guest User,

Please feel free to have a look around the forum but be aware that as an unregistered guest you can't see all of it and you can't post.

To access these 'Registered Users Only' areas simply register and login.

Time to rebuild my old GPz

Work in Progress

Moderators: chrisu, paul doran, Taffus, KeithZ1R

Message
Author
User avatar
GPZ592
100Club
100Club
Posts: 134
Joined: 3rd Feb 2017
Location: Surrey/Sussex Border

Re: Time to rebuild my old GPz

#76 PostAuthor: GPZ592 » Tue Jan 19, 2021 11:24 am

Next on the list to rebuild were the forks, but I came across an issue with the springs that I need to resolve before I can progress.

The fork springs are not original, but a set of WP Progressive springs I fitted back in the day when I proddy raced the 550. They were great on the circuits, but when I converted the bike to road use I remember the front end was harsh over normal road bumps. They are longer than the standard springs and I remember it took 2 of us to compress them and fit the spring retaining plug in the forks :shock: As I also want to fit cartridge emulators in the forks, this will add even more length and preload on an already stronger spring than standard. My fear is that the forks will be just too stiff and top out and have no static sag.

Standard spring length 590mm
WP spring length 635mm
Cartridge emulator 15mm

So you can see there is an additional 60mm length to compress on an already stronger spring than standard !

I've started to investigate alternative springs and this brings me to my second problem. The GPz 550 spanned 3 models over 7 years and all used different spring lengths (all with no spacer) and with different wheel travel.

GPz550 D1 (1981) - Spring length 565mm, Wheel travel 180mm
GPz550 H1/2 (1982-83) - Spring length 590mm, Wheel travel 180mm
GPz550 A1-5 (1984 - 88) - Spring length 510mm, Wheel travel 160mm

Most of the manufacturers I've contacted only supply a single spring for all the models at 515mm. Some say they provide spacers, others don't (how you can run a spring 75mm less than standard with no spacer is beyond me :shock: ). Only Wirth produce a spring of the original length (587mm).

So my question is - If I run a 515mm spring with a 75mm spacer will I have an issue ? I have a concern that a spring that is physically shorter than stock will not allow full movement of the fork and would get coil bound before maximum fork travel is achieved ? Or, are the shorter springs wound sufficiently to compensate for this ? I've emailed the companies concerned and asked the question, but all I get back is the answer "that is the spring we have developed for the bike".

Thoughts/comments ?

Thanks.

Mark.
"Racing is life. Anything before or after is just waiting" - Steve McQueen

Philippe
Hardcore
Hardcore
Posts: 1999
Joined: 26th Oct 2017
Location: België

Re: Time to rebuild my old GPz

#77 PostAuthor: Philippe » Tue Jan 19, 2021 2:52 pm

Hi Mark

I have no experience in changing fork springs but I would give you the advice to use springs with the correct lenght or as close to it as possible. Mounting new springs will give an improvement. If you want the fork to be a bit "harder" use a thicker fork oil (15 instead of 10). At least, that's what I always do and it feels good when riding a bike.
It all depends on what you intend to do with your bike, ride it like hell or use it in a more civilised way...which is cheaper and better for your health :)
GrtZ
Philippe
the differences between a little boy and an adult man is the price and size of their toys!

User avatar
GPZ592
100Club
100Club
Posts: 134
Joined: 3rd Feb 2017
Location: Surrey/Sussex Border

Re: Time to rebuild my old GPz

#78 PostAuthor: GPZ592 » Mon Mar 15, 2021 4:59 pm

So, it's been a couple of months since my last update and it's been a case of one step forward, two steps back with the 550 :( But let's start with the positives !

After some consideration about where to go with the front fork springs, I had a chat with Larry at PDQ (thanks for the recommendation, Al) and bought a set of Racetech linear springs. I'm hoping that these along with the YSS emulators, will improve the fork setup. I've yet to rebuild the forks, but I have all I need to complete them now.

I've also had my original Harris 4-1 Ceramic coated. After a false start with another company I eventually sent it to Maldon Powder Coat and they turned it round in about a week. The finish is "Glacier Black" and looks quite smart, I think.

Exhaust Ceramic Small.jpg


Now to the negatives. The first was a newly painted body set that I went to collect from the sprayer to find air bubbles under the decals :( So that in having to be re-done.

The next is one of my own making and a bit embarrassing. I needed to replace the needle roller bearings in the swingarm and I had a hell of a job removing them as they were really tight. The GPz 550 does not have a spindle running the full width of the swingarm ,but 2 bosses that mount into each side of the frame (the picture below explains it better) and each contains a needle roller.

Original Swingarm Small.jpg


I tried to drift them out but I was using too much "hammer" for my liking. I then tried pressing them out using a combination of a suitable socket, some threaded rod and nuts - they moved, but only so far ! In the end, I used a Dremel and ground them away until they were easy to drift out. I thought all was good, until I tried to test fit the swingarm into the frame after powder coating - it wouldn't fit. On examination, it transpires I had managed to bend the bosses of the swingarm in my ham fisted attempt to remove the bearings :( Cue much swearing and spanners being thrown around the garage. I had to walk away from it for a week to calm down...........................

Bent Swingarm Small.jpg


After a few days quiet contemplation, I called Tommy at Maidstone Motoliner to see if he could get me out of the s**t once again. Thankfully he said he could and he did :) I now have a totally straight swingarm - Tommy even fitted the new needle rollers for me and didn't even damage the fresh powdercoat :D I cannot rate him and the team at Maidstone Motoliner highly enough !

So that's about up to date. Next jobs are to get the swingarm & shock in, build and fit the forks/yokes. Hopefully the next update will have her back on two wheels :)

Mark.
"Racing is life. Anything before or after is just waiting" - Steve McQueen

User avatar
GPZ592
100Club
100Club
Posts: 134
Joined: 3rd Feb 2017
Location: Surrey/Sussex Border

Re: Time to rebuild my old GPz

#79 PostAuthor: GPZ592 » Sun Mar 28, 2021 8:18 pm

This weekend has been a good weekend :D The swingarm & shock are in, as is the rear wheel. The yokes are also on, but the forks are still not built. I thought I had everything but the NOS bushes for the bottom of the stanchions I have are not the correct size (there's a story to this which I shall elaborate on in a later post ! ) Hopefully the correct ones now are in the post.

Anyway, here's the progress so far.....................

Build1 Small.jpg
"Racing is life. Anything before or after is just waiting" - Steve McQueen

User avatar
GPZ592
100Club
100Club
Posts: 134
Joined: 3rd Feb 2017
Location: Surrey/Sussex Border

Re: Time to rebuild my old GPz

#80 PostAuthor: GPZ592 » Mon Apr 19, 2021 2:29 pm

Following on from my last post, the forks are now rebuilt following the debacle of the lower fork bush.

To cut a very long story short (and this is the abridged version !) - the parts diagram I have for my 1982 GPz550H1 (supplied by Kawasaki customer services), lists 2 part numbers for the fork bush. I assumed this was for the upper & lower fork bushes, but apparently not. When both bushes arrived, neither matched the lower bush and only 1 matched the upper. A quick conversation with the parts guy at my local Kawasaki dealer, confirmed both part numbers are for the upper bush only, but for different models of GPz 550 (mine and the later "A" series :( Not sure how the Kawasaki parts diagram could be incorrect and list a part that is not for the model of bike it references, but there it is.

The lower bush is an odd size, so no OEM suspension supplier had one to match either. In desperation I researched other Kawasaki models with the same fork size and used CMSNL to reference part numbers - to my joy, I found the Z550F of the same year had the same forks as my GPz and the parts diagram listed a lower fork bush :) However, my joy turned to despair when I found the part was NLA from Kawasaki and none of my usual UK dealers had any old stock. I turned to the net and found one on Ebay in Italy and another in Germany - I just hit BIN and waited................ Thankfully, when they arrived, they were indeed the correct size and were duly fitted to the stanchions. One happy bunny :D

New Racetech linear springs & YSS emulators completed the upgrades to the front end and they're now ready to be reunited with the frame.

New & old bush

Fork Bush (small).jpg
Fork Bush (small).jpg (59.43 KiB) Viewed 119114 times


New bush fitted

Fork Bush Fitted (Small).jpg
Fork Bush Fitted (Small).jpg (114.01 KiB) Viewed 119114 times


Racetech Springs

Racetech Springs (Small).jpg


Completed Forks

Completed Forks (Small).jpg
Completed Forks (Small).jpg (87.63 KiB) Viewed 119097 times
"Racing is life. Anything before or after is just waiting" - Steve McQueen

User avatar
GPZ592
100Club
100Club
Posts: 134
Joined: 3rd Feb 2017
Location: Surrey/Sussex Border

Re: Time to rebuild my old GPz

#81 PostAuthor: GPZ592 » Wed Apr 21, 2021 8:31 pm

This week just keeps getting better - I had a call from the painter that my bodywork was ready to collect. This was the second attempt as the first time around there were a number of blisters under the decals that I wasn't happy with. Thankfully, there were no such dramas this time around :D It's now all safely stored away until I am ready to fit it on the bike :vcool

Bodywork (Small).jpg
"Racing is life. Anything before or after is just waiting" - Steve McQueen

User avatar
GPZ592
100Club
100Club
Posts: 134
Joined: 3rd Feb 2017
Location: Surrey/Sussex Border

Re: Time to rebuild my old GPz

#82 PostAuthor: GPZ592 » Mon May 17, 2021 4:26 pm

Well it's been a few weeks since I last posted with an update on my old GPz and progress has been slower than I hoped. It's the normal story of what should be a half hour job taking half a day :( Then there's the obligatory search for that missing bolt/spacer/bracket that you know you removed from the bike, but since everything has been plated or painted, it isn't in the right container with all the other bits it should live with and isn't anywhere you look :shock:

That aside, there's been a few wins and the satisfaction of renovating old bits. Take the inner rear mudguard - it has a small rubber flap that fits around the top of the shock/swingarm to stop stones/grit, etc being thrown up from the rear tyre into the shock body. Anyway, mine was old and torn and I made a new one from a sheet of rubber and I think It turned out really well, even if I say so myself :D I could have bought a whole NoS inner mudguard for £20, but where's the satisfaction in that :lol:

1) Take one old knackered flap and a sheet of rubber

Flap1.jpg
Flap1.jpg (74.46 KiB) Viewed 118943 times


2) Cut to shape.......

Flap2.jpg
Flap2.jpg (53.07 KiB) Viewed 118943 times


3) Rivet to the mudguard

Flap3.jpg
Flap3.jpg (158.01 KiB) Viewed 118943 times


4) Then install on bike

Flap4.jpg
Flap4.jpg (92.6 KiB) Viewed 118943 times


After a good weekend in the garage, the GPz is now on it's wheels with a number bits bolted on and it's starting to look like a bike again. The plan is to get as much of the rolling chassis completed as possible and then to move onto the engine - watch this space :)

on 2 wheels.jpg
on 2 wheels.jpg (155.23 KiB) Viewed 118943 times
"Racing is life. Anything before or after is just waiting" - Steve McQueen

User avatar
Al
Hardcore
Hardcore
Posts: 2811
Joined: 21st Oct 2007
Location: Farnbronx, Sin City, N.E. Hants

Re: Time to rebuild my old GPz

#83 PostAuthor: Al » Mon May 17, 2021 7:01 pm

Big landmark there getting her up off her knees and onto wheels, well done.
What on earth are you going to do next after this is done?? :?:
I cant imagine.

AL
1981 J1

User avatar
GPZ592
100Club
100Club
Posts: 134
Joined: 3rd Feb 2017
Location: Surrey/Sussex Border

Re: Time to rebuild my old GPz

#84 PostAuthor: GPZ592 » Tue May 18, 2021 10:55 am

Al wrote:Big landmark there getting her up off her knees and onto wheels, well done.
What on earth are you going to do next after this is done?? :?:
I cant imagine.

AL


Thanks Al, yes it feels like a milestone has been reached :)

The next project is already lined up and is sitting in the garage under the cover next to the GPz - it's my other P&M (yes, I have 2 :shock: ) It's a long story, which I will save for when I start the rebuild, but this is an F2 to go alongside my F1. The engine is based on the GPz 550 engine and had had a lot of work done on it by Jim Wells back in the day. But as I say, that's for another day - I need to concentrate on the road GPz550 to get that finished before this year's riding season is over !

Mark.
"Racing is life. Anything before or after is just waiting" - Steve McQueen

User avatar
GPZ592
100Club
100Club
Posts: 134
Joined: 3rd Feb 2017
Location: Surrey/Sussex Border

Re: Time to rebuild my old GPz

#85 PostAuthor: GPZ592 » Sun Oct 10, 2021 11:43 am

Well its been a few months since my last update and there's not been a lot of progress, sadly. Life just seems to have got in the way lately and other things have taken priority and the poor old GPz has got pushed down the pecking order :( I've tried to keep things ticking over and doing little jobs as and when time allows, but there's not been massive progress of late.

One of the jobs I did manage to complete was to get the brakes fitted, although it wasn't all plain sailing ! I had previously had the brakes totally rebuilt and they'd been sat on a shelf in the garage waiting to be re-united with the bike. The rear went on perfect and I had it fitted & bled within 30 minutes. The front, however, was a different story. To cut a long story short, the m/cyl piston would not return fully after compression, so no fluid was being pumped into the lines. What followed was a few weeks of frustration as I returned the m/cyl to Powerhouse for inspection. They found no problem, sent it back, it was still the same. I sent it back again and again they found no problem. So third time lucky ? Yes, this time the m/cyl piston finally returned fully and I could now bleed the brakes OK. Not sure why there was an issue before, possibly the length of time they sat in my garage caused the seal to swell or age ? Who knows, but it's sorted now and one more job off the list :D

One job I did have success with was rebuilding the old ignition switch. The lock worked OK, but it had worn so much you could remove the key in the "on" position" :shock: I know I could have bought a pattern lock and possibly had it modified to my key, but all the locks are original and 1 key fits all, so I wanted to retain it if at all possible. I had a couple of other , old ignition locks from other bikes, so used them as a guinea pig to see how to strip them down and what I was faced with. I also thought I might be able to cannibalise them to make a good one for me. Once stripped down, I found the issue was wear on the brass tumblers - over the years, the action of the key being inserted & removed had worn a groove in all of them. Looking at them, I thought maybe I could build them up using a brazing torch & filler rod. What followed was a very lengthy process of brazing up, then filing down 7 tumblers, checking all the time to get the correct height when the key was inserted. Although very time consuming, it was very rewarding to re-assemble the switch and have it not only work, but the key does not pull out in the "on" position - result :D A coat of paint on the switch body and a new decal for the lettering completed the job.

You can see the original tumblers at the bottom and the lower edge of the inner cut out is dished - this is the area that needed building back up. Above are the tumblers after brazing. The filler went in places I didn't need ! So it was a lot of filing to get them perfect !

Tumblers.jpg
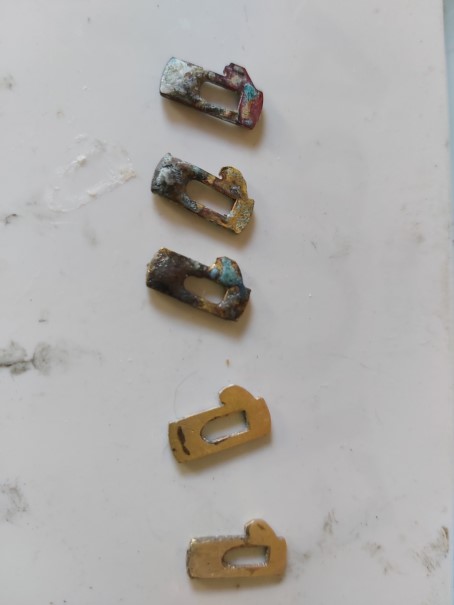
Tumblers.jpg (26.11 KiB) Viewed 118544 times


But when they all line up when the key is inserted, all that effort is worth it !

Lock.jpg
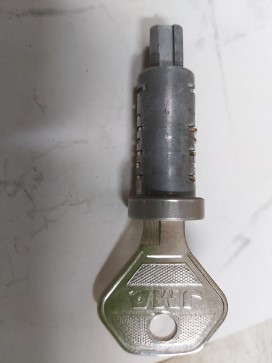
Lock.jpg (16.19 KiB) Viewed 118544 times


The lettering on the cover was just a bit too faded. Unfortunately, the lettering is very slightly raised off of the surface, so despite my best efforts, I couldn't touch it in to my satisfaction and used a decal instead.

Switch cover.jpg
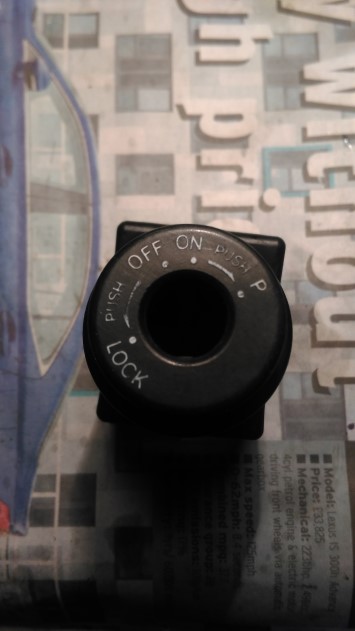
Switch cover.jpg (35.97 KiB) Viewed 118544 times


And here it is, complete and fitted to the bike.

Ignition Switch.jpg
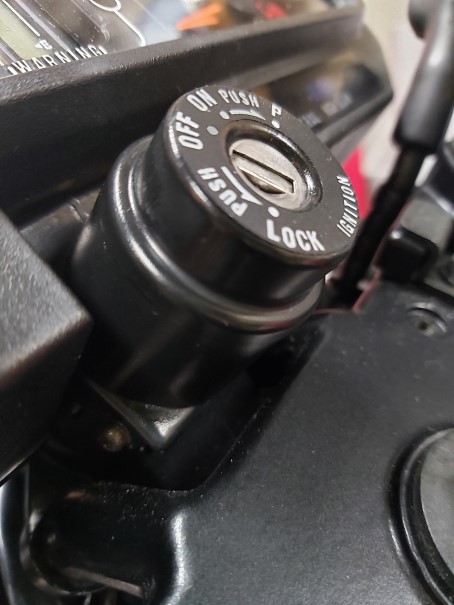
Ignition Switch.jpg (55.39 KiB) Viewed 118544 times
"Racing is life. Anything before or after is just waiting" - Steve McQueen

User avatar
GPZ592
100Club
100Club
Posts: 134
Joined: 3rd Feb 2017
Location: Surrey/Sussex Border

Re: Time to rebuild my old GPz

#86 PostAuthor: GPZ592 » Wed Jan 05, 2022 11:30 am

The next job was to tackle was the switchgear & wiring. The GPz switches are plastic and the lettering is just stenciled on at the factory. The cases had aged and a lot of the lettering had been rubbed off due to use ! Initially I just cleaned up the switches, but I couldn't get them to a finish I was happy with. so I stripped them and rubbed down the cases before spraying them with a plastic primer, then acrylic satin black and once the new decals were applied, I sealed the whole thing with a matt lacquer. The lettering on the knobs, I touched up using humbrol enamel. Once re-assembled and back on the bike, they look OK and I'm happy with the finish.

Switch1.jpg
Switch1.jpg (41.72 KiB) Viewed 118078 times

Switch2.jpg
Switch2.jpg (38.25 KiB) Viewed 118078 times

Switch3.jpg
Switch3.jpg (43.64 KiB) Viewed 118078 times

Switch4.jpg
Switch4.jpg (41.93 KiB) Viewed 118078 times


Once the switches were fitted, I could then run the new loom and various electrical fittings. This then allowed me to sort out the next job - fabricating a bracket for the new CDI. As I mentioned at the start of the build, one upgrade I am applying is replacing the standard "bob weight" advance mechanism with a later static pickup and a newer CDI which has the advance curve built in, it also has a rev limiter which will stop me over revving and bending the valves like before :( This newer CDI is larger than the standard one, so will not mount in the same place. As I'm intending to run the carbs on individual filters, the space where the airbox used to be is an ideal location for the new CDI bracket. So, following useful advice from many people, I constructed cardboard templates for the bracket before cutting out the pieces from 1.2mm steel. I then used my Hobby MIG to weld them together ( I apologise now if the welds make any professionals on here cringe, but they're pretty good for me ! My skills are in IT, not metalwork & welding :lol: ) It'll be hidden by the side panel anyway and a trial fit proved it does the job and I'll paint it when the weather warms up a bit.

All the parts cut out, bent and ready to weld up
Bracket1.jpg
Bracket1.jpg (53.75 KiB) Viewed 118078 times


Finished bracket
Bracket3.jpg
Bracket3.jpg (71.48 KiB) Viewed 118078 times


Bracket2.jpg
Bracket2.jpg (58.93 KiB) Viewed 118078 times


Trial Mounted on frame and with new CDI fitted
Bracket 5.jpg
Bracket 5.jpg (106.01 KiB) Viewed 118078 times


Bracket4.jpg
Bracket4.jpg (90.14 KiB) Viewed 118078 times


So here's where I am now. Next job - start building the engine up :D

Electrics fitted 2 small.jpg
Electrics fitted 2 small.jpg (127.01 KiB) Viewed 118078 times
"Racing is life. Anything before or after is just waiting" - Steve McQueen

Philippe
Hardcore
Hardcore
Posts: 1999
Joined: 26th Oct 2017
Location: België

Re: Time to rebuild my old GPz

#87 PostAuthor: Philippe » Wed Jan 05, 2022 5:49 pm

Hi GPZ592

you're doing a great job! That's the way it should be done by everybody!
Keep up the good work!
GrtZ
Philippe
the differences between a little boy and an adult man is the price and size of their toys!

User avatar
GPZ592
100Club
100Club
Posts: 134
Joined: 3rd Feb 2017
Location: Surrey/Sussex Border

Re: Time to rebuild my old GPz

#88 PostAuthor: GPZ592 » Thu Jan 06, 2022 5:58 pm

Philippe wrote:Hi GPZ592

you're doing a great job! That's the way it should be done by everybody!
Keep up the good work!
GrtZ
Philippe


Thanks Philippe. This bike means a lot to me, so I'm doing the best job I can. It's taking longer than I wanted, but it will be worth it in the end :)
"Racing is life. Anything before or after is just waiting" - Steve McQueen

User avatar
Garry.L
Hardcore
Hardcore
Posts: 3083
Joined: 11th Jun 2011
Location: Cheapest Cheshire

Re: Time to rebuild my old GPz

#89 PostAuthor: Garry.L » Fri Jan 07, 2022 4:48 pm

Loving the Work done, very impressive :D .

I managed to clean up the switchgear on my Turbo and just replaced the decals, but yours look very OE.

DSC02341.JPG
ʎɐqǝ uo pɹɐoqʎǝʞ ɐ ʎnq ı ǝɯıʇ ʇsɐן ǝɥʇ sı sıɥʇ

User avatar
GPZ592
100Club
100Club
Posts: 134
Joined: 3rd Feb 2017
Location: Surrey/Sussex Border

Re: Time to rebuild my old GPz

#90 PostAuthor: GPZ592 » Sun Jan 09, 2022 10:50 am

Garry.L wrote:Loving the Work done, very impressive :D .

I managed to clean up the switchgear on my Turbo and just replaced the decals, but yours look very OE.

DSC02341.JPG


Thanks.

My switch cases were worse than yours and had a very "mottled" appearance, so spraying them was the only way to go.
"Racing is life. Anything before or after is just waiting" - Steve McQueen


Return to “Projects”

Who is online

Users browsing this forum: No registered users and 71 guests