Page 3 of 6
Re: Harris Build
Posted: Thu Sep 27, 2018 10:26 pm
Author: cakeman
zed1015 wrote:cakeman wrote:I assume I can use either a Unitrak head or a B2 head ? Are there any other's that are compatible?
No. Unitrack head has different (steeper) exhaust valve angles to the B2 and all the others.
If you have a unitrack bottom end (18mm gudgeon pins) you need to use the Uni head unless you want to get into modifying the exhaust valve pockets on the pistons.
Great info, cheers for that. It looks like I'm after a B2 head then as the bottom end is B1 (according to the engine numbers) as the castings above the inlets are not present. Are there any other heads that are compatible with a B1 engine and barrels?
Re: Harris Build
Posted: Thu Sep 27, 2018 10:47 pm
Author: zed1015
If it's a B1 motor then a 'J' head will fit or any with a full hemi (non bathtub) 70mm combustion chamber.
Having 'B' engine numbers does not mean it is B spec as the cases are the same as the unitrack and the internals are interchangeable.
You need to measure the gudgeon pin diameter as only the UNITRACK had 18mm pins and all the others are 17mm.
To be sure of what you have post a pic of the head showing the valves.
Also the UNI head has a letter 'A' stamped in each of the inlet tracts unless it has been erased by porting .
Re: Harris Build
Posted: Fri Sep 28, 2018 5:44 am
Author: cakeman
zed1015 wrote:If it's a B1 motor then a 'J' head will fit or any with a full hemi (non bathtub) 70mm combustion chamber.
Having 'B' engine numbers does not mean it is B spec as the cases are the same as the unitrack and the internals are interchangeable.
You need to measure the gudgeon pin diameter as only the UNITRACK had 18mm pins and all the others are 17mm.
To be sure of what you have post a pic of the head showing the valves.
Also the UNI head has a letter 'A' stamped in each of the inlet tracts unless it has been erased by porting .
More great info again cheers, I did wonder about the stamps just inside the inlet tract, mine has "5" stamped in them. I'll post a picture later.
Re: Harris Build
Posted: Fri Sep 28, 2018 6:01 am
Author: cakeman
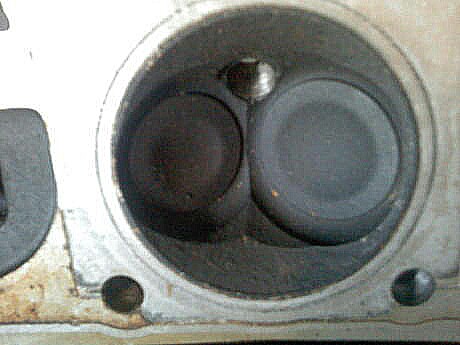
Here's a picture of the head.
Re: Harris Build
Posted: Fri Sep 28, 2018 7:53 am
Author: zed1015
It's hard to tell in the pics with all the carbon and shadows but that doesn't look like a Uni head so most likely a B.
If that's the case you want a B or a J head but the thread damage you describe could easily repaired by a good machinist like the head in the following pic that was repaired by Debbens.

- 26907365_1534791533309001_8598580425535150896_n.jpg (61.21 KiB) Viewed 7300 times
Here's a clearer pic of a Uni combustion chamber to be sure.
Note the deeper "Bathtub" area of the chamber where the valves sit.
- IMG_20141004_200143.jpg (37.69 KiB) Viewed 7300 times
Re: Harris Build
Posted: Fri Sep 28, 2018 8:27 am
Author: cakeman
I'll definately give Debbens a ring zed, that looks just like the kind of repair I need doing.
Thanks for the help, very much appreciated.
Re: Harris Build
Posted: Sun Oct 07, 2018 8:35 am
Author: cakeman
So, take two, engine assembled with new gaskets, valve seals etc. just waiting for the cam cover gasket to arrive and it’ll be time to put it back in the frame at last.
Re: Harris Build
Posted: Sun Oct 07, 2018 11:16 am
Author: Al
Looks great well done.
AL
Re: Harris Build
Posted: Tue Oct 09, 2018 8:42 pm
Author: walshyco
Did you paint the engine yourself?
Re: Harris Build
Posted: Wed Oct 10, 2018 5:26 am
Author: cakeman
walshyco wrote:Did you paint the engine yourself?
Yup, had the engine soda blasted to remove the old layers of black paint and then ended up spraying it in the back of me old Maxus van as the garage is full at the moment lol, makes a handy spray booth tbh

Re: Harris Build
Posted: Wed Oct 10, 2018 5:41 am
Author: cakeman
Engine in the frame and forks fitted. Apologies for the quality of the picture, it was late and a bit cramped lol.
Re: Harris Build
Posted: Thu Oct 11, 2018 4:38 pm
Author: deka
Looking good
Re: Harris Build
Posted: Thu Oct 11, 2018 6:30 pm
Author: martinz1000r
How much fun was getting the motor in? My Suzuki engined Magnum was like one of the Chinese puzzles you used to get in crackers at Christmas. The only way was to lower the frame over the motor, twist, tilt, turn and prey. Never taking that out again!
Re: Harris Build
Posted: Thu Oct 11, 2018 8:09 pm
Author: cakeman
martinz1000r wrote:How much fun was getting the motor in? My Suzuki engined Magnum was like one of the Chinese puzzles you used to get in crackers at Christmas. The only way was to lower the frame over the motor, twist, tilt, turn and prey. Never taking that out again!
Really easy tbh, lowered the frame over the engine, rear mounting bolt in followed by the fronts....job done, then realise that it wasn't a clever move to leave the rocker cover off, so, remove the rear mounting bolt and lift the frame enough to pop the rocker cover back on lol.....going to be fun doing the shims in the future
Re: Harris Build
Posted: Tue Oct 23, 2018 5:37 pm
Author: cakeman
Not updated for a while due to picking up some lurgy type bug but have managed a few bits and pieces. Rear wheel and spacers are all sorted, ended up using a gsx750f rear wheel complete with disc, caliper carrier and sprocket carrier, it all lined up to within a mill and the chain run is cock on which was a result, just needed a couple of spacers on the brake side which needed to be 20mm in length and another 25mm long with a 20mm bore and as luck would have it found the exact sizes on eBay for £16 in stainless. Also ordered a set of Delkevic downpipes from D&K which arrived today so I found a bit of time to get them fitted this afternoon, must say the quality is great and they fitted perfectly, very impressed for £170 and I only ordered them Monday afternoon. Here’s a pic.