Hello Guest User,

Please feel free to have a look around the forum but be aware that as an unregistered guest you can't see all of it and you can't post.

To access these 'Registered Users Only' areas simply register and login.

Z1000st Project

Work in Progress

Moderators: chrisu, paul doran, Taffus, KeithZ1R

Message
Author
User avatar
Gus
Hardcore
Hardcore
Posts: 1484
Joined: 17th Mar 2007
Location: Gloucestershire

Re: Z1000st Project

#46 PostAuthor: Gus » Wed Jun 12, 2019 11:28 am

Might be worth checking this dimension just in case as there is one in that area.

17. PIN,6X16 92042-016

Image
"Set the GRINDER on it"

Philippe
Hardcore
Hardcore
Posts: 1999
Joined: 26th Oct 2017
Location: België

Re: Z1000st Project

#47 PostAuthor: Philippe » Wed Jun 12, 2019 2:56 pm

Hi Simonic
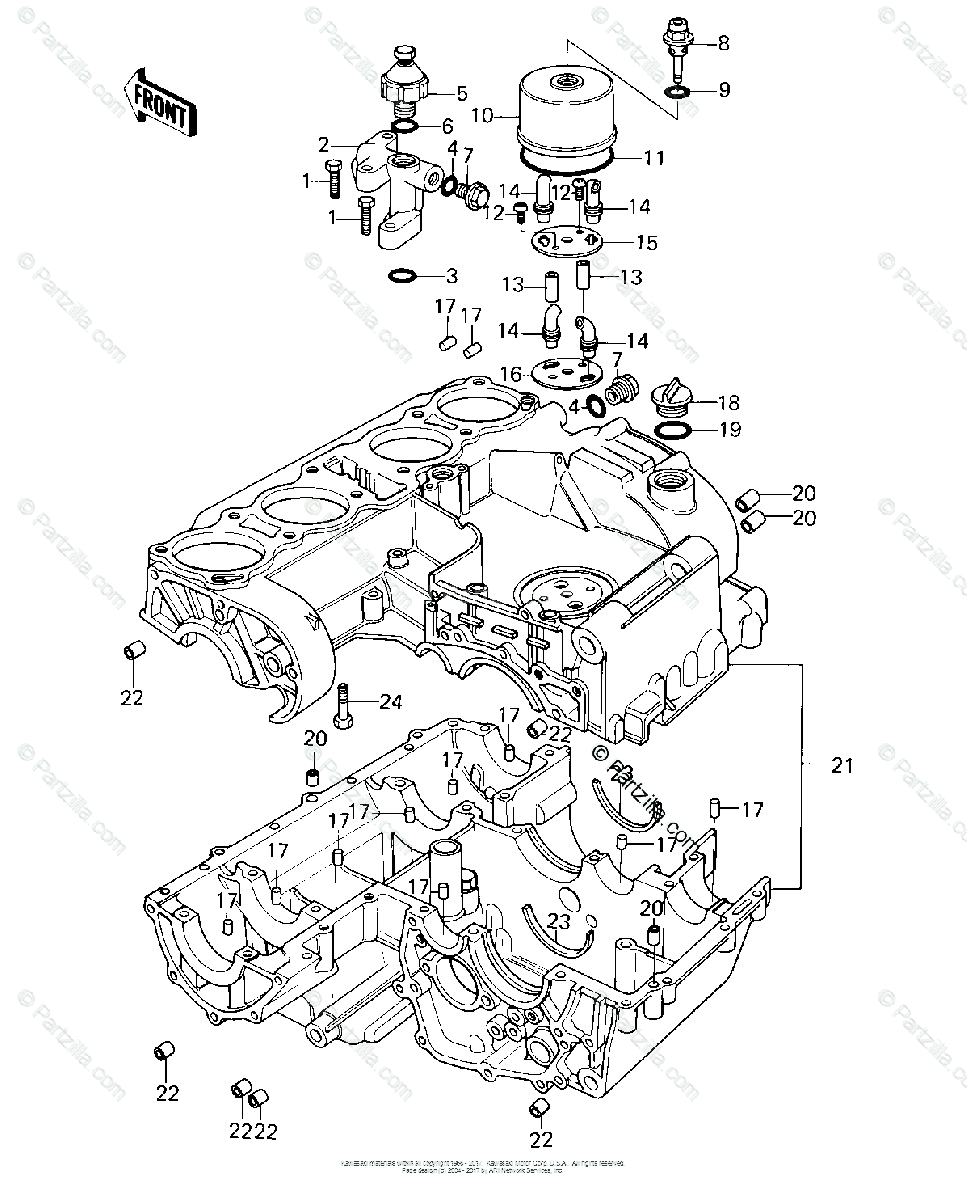
that "little fellow" can come from a few different places: the pin that keeps the kickstarter shaft in place, one of the five pins of the cranckshaft, one of the pins that keeps the cages of the roller bearings of the input or the output shaft in place.
These are all situated in the upper cranckcase. If one of them dropped out, take a dowel, place it on the side of the gap where the pin should be and give a gentle tap on the dowel with a hammer. Put the pin back in the hole afterwards and make sure it stays out about 5 mm.
As far as the broken output shaft is concerned: don't mind, it's common. It's one of the weak spots of the ST.
If you can find a complete shaft, replace the one in your engine, if not, find someone who can work with a lathe.
Let him drill a hole in the shaft, make a thread in it (M10) and use an M10 allen bolt to secure the coupling of the drive shaft. (Take a look at how it's done in one of my previous projects; I think there's a picture)
Your ST will also work without the nut in place. The coupling is held in place by the strong spring.
Good luck!
GrtZ
Philippe
the differences between a little boy and an adult man is the price and size of their toys!

User avatar
Simonic
100Club
100Club
Posts: 455
Joined: 4th Dec 2017
Location: Ossett

Re: Z1000st Project

#48 PostAuthor: Simonic » Thu Jun 13, 2019 6:01 am

Thank You also Phillippe.
I felt sure you would have some good input for me.
The engine is now out and i will be delivering it to my engine builder next monday
'83 ZX1100 '81 Z1000ST, '04 GSX1400, '19 Dodge Challenger Hemi

Philippe
Hardcore
Hardcore
Posts: 1999
Joined: 26th Oct 2017
Location: België

Re: Z1000st Project

#49 PostAuthor: Philippe » Thu Jun 13, 2019 11:05 am

Hi Simonic
do you have the dimensions of the "little fellow"?
If it comes out of the front bevel gear case it might be the little pin to hold the drive schaft on the front bevel gear case. It all depends upon the dimensions and in this case: size matters! If it's very small you have an identification of your "little fellow" if not, keep searching.
GrtZ
Philippe
the differences between a little boy and an adult man is the price and size of their toys!

User avatar
Simonic
100Club
100Club
Posts: 455
Joined: 4th Dec 2017
Location: Ossett

Re: Z1000st Project

#50 PostAuthor: Simonic » Thu Jun 13, 2019 12:05 pm

Hi Phillippe.
it is very small.I'll take another pic when i get home next to a tape measure.
Thank You Sir
'83 ZX1100 '81 Z1000ST, '04 GSX1400, '19 Dodge Challenger Hemi

Philippe
Hardcore
Hardcore
Posts: 1999
Joined: 26th Oct 2017
Location: België

Re: Z1000st Project

#51 PostAuthor: Philippe » Thu Jun 13, 2019 1:30 pm

Hi Simonic
the pin that connects the propellershaft to the front bevel gear case measures: 6 mm long and has a diameter of 4 mm.
If it's this one, DON'T loose it, I'm not sure if you can stil buy it.
GrtZ
Philippe
the differences between a little boy and an adult man is the price and size of their toys!

User avatar
Gus
Hardcore
Hardcore
Posts: 1484
Joined: 17th Mar 2007
Location: Gloucestershire

Re: Z1000st Project

#52 PostAuthor: Gus » Thu Jun 13, 2019 2:17 pm

All pins appear to be currently available from Cradley Heath Kawasaki

Gus
"Set the GRINDER on it"

User avatar
Simonic
100Club
100Club
Posts: 455
Joined: 4th Dec 2017
Location: Ossett

Re: Z1000st Project

#53 PostAuthor: Simonic » Thu Jun 13, 2019 2:59 pm

6mm by 4mm......That could well be it..... Now...Where did i put it ?? :eek :eek
'83 ZX1100 '81 Z1000ST, '04 GSX1400, '19 Dodge Challenger Hemi

User avatar
Simonic
100Club
100Club
Posts: 455
Joined: 4th Dec 2017
Location: Ossett

Re: Z1000st Project

#54 PostAuthor: Simonic » Fri Aug 23, 2019 8:42 am

I had a trip to my engine builers last week. He was partly thru doing the grinding in of the valves and a little porting. While he is finishing this off i've brought the crankcases home to paint.
I'm going for a stock look in black.
So,gentlemen.
What should i use for paint?
I'm able to spray thru a gun as well as use a rattle can and i have facilities to cure.
Thank You
Attachments
thumbnail_20190812_152555.jpg
thumbnail_20190812_154814.jpg
thumbnail_20190812_154806.jpg
thumbnail_20190812_152711.jpg
thumbnail_20190812_152702.jpg
thumbnail_20190812_152625.jpg
thumbnail_20190812_152606.jpg
'83 ZX1100 '81 Z1000ST, '04 GSX1400, '19 Dodge Challenger Hemi

User avatar
zed1015
Hardcore
Hardcore
Posts: 3810
Joined: 2nd Nov 2005
Location: Somewhere between Scunny and Goole.

Re: Z1000st Project

#55 PostAuthor: zed1015 » Fri Aug 23, 2019 8:48 am

Simoniz / Sperex Tough black satin or Wurth satin black is the closest to the stock finish you will get and can be either cured in use or baked on.
Once cured they are both fuel and heat resistant and last for years.

User avatar
Simonic
100Club
100Club
Posts: 455
Joined: 4th Dec 2017
Location: Ossett

Re: Z1000st Project

#56 PostAuthor: Simonic » Fri Aug 23, 2019 9:14 am

zed1015 wrote:Simoniz / Sperex Tough black satin or Wurth satin black is the closest to the stock finish you will get and can be either cured in use or baked on.
Once cured they are both fuel and heat resistant and last for years.


Thank You Sir.
Much appreciated
Simon
'83 ZX1100 '81 Z1000ST, '04 GSX1400, '19 Dodge Challenger Hemi

Philippe
Hardcore
Hardcore
Posts: 1999
Joined: 26th Oct 2017
Location: België

Re: Z1000st Project

#57 PostAuthor: Philippe » Fri Aug 23, 2019 1:01 pm

Hi Simon
it looks like a new engine ! Great job! Will be splendid after painting.
Carry on my friend
GrtZ
Philippe
the differences between a little boy and an adult man is the price and size of their toys!

User avatar
Simonic
100Club
100Club
Posts: 455
Joined: 4th Dec 2017
Location: Ossett

Re: Z1000st Project

#58 PostAuthor: Simonic » Sat Aug 24, 2019 4:24 am

Philippe wrote:Hi Simon
it looks like a new engine ! Great job! Will be splendid after painting.
Carry on my friend
GrtZ
Philippe

Thank You Philippe :D
'83 ZX1100 '81 Z1000ST, '04 GSX1400, '19 Dodge Challenger Hemi

User avatar
Simonic
100Club
100Club
Posts: 455
Joined: 4th Dec 2017
Location: Ossett

Re: Z1000st Project

#59 PostAuthor: Simonic » Sat Nov 02, 2019 9:46 am

Hello Gentlemen.
Today i'm removing the swinging arm from the frame.
I've hit a small snag,wonder if you guys can help at all.
I've added a pic from the manual so you can see what i'm talking about.
So. I've removed the dust cover(1)Unscrewed the nut (2) Taken out the allen bolts(3)Removed the triangular plate(4)
I'm struggling to remove(5)The threaded end to the left is now exposed,the right hand end looks to be plain with now thread so i'm thinking it should jut pull out,is this the case?
Any tips much appreciated
I'm sorry the pic has come thru sideways.....
Attachments
thumbnail_20191102_093132.jpg
'83 ZX1100 '81 Z1000ST, '04 GSX1400, '19 Dodge Challenger Hemi

Philippe
Hardcore
Hardcore
Posts: 1999
Joined: 26th Oct 2017
Location: België

Re: Z1000st Project

#60 PostAuthor: Philippe » Sun Nov 03, 2019 4:44 am

Hi Simonic
part n° 5 is the pivot shaft. It should come out easy...if there's no rust between the shaft and the frame.
The outer end has a thread, the inner end sits in the swing arm bearing.
If it's stuck, use some penetrating oil and leave it for a while...if it remains stuck take an allen key and put it in the hexagonal hole in the pivot shaft and gently try to turn it around, clockwise or counterclockwise doesn't matter. As soon as it turns freely around you can remove it .
In the ultimate case you can try this method:
- get three longer allen bolts M8 and three M8 nuts
- screw the pivot shaft stop(triangular plate) on the pivot shaft threaded end but not completely, leave room for the three nuts between the frame and the stopper
- put the three allen bolts through the plate, screw the nuts on them and screw the bolts in the holes of the frame so that the triangular plate is stuck and doesn't turn,
- turn the pivot shaft clockwise with the allen key
- the pivot shaft should come out now.
Don't use too much strenght so that you don't damage the thread on the pivot shaft or the hexagonal hole in the pivot shaft.
A lot of penetrating oil and patience should do the job
And don't forget, when putting the pivot shaft back, to put enough grease on it in order to prevent it from sticking in the frame again
Good luck with it!
GrtZ
Philippe
the differences between a little boy and an adult man is the price and size of their toys!


Return to “Projects”

Who is online

Users browsing this forum: No registered users and 21 guests