Hello Guest User,

Please feel free to have a look around the forum but be aware that as an unregistered guest you can't see all of it and you can't post.

To access these 'Registered Users Only' areas simply register and login.

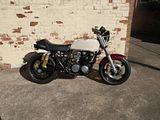
Z650 into 810 project

Work in Progress

Moderators: chrisu, paul doran, Taffus, KeithZ1R

Message
Author
Crofty
Custard Cream
Custard Cream
Posts: 887
Joined: 18th Nov 2009
Location: York

#166 PostAuthor: Crofty » Fri Jan 11, 2013 10:03 pm

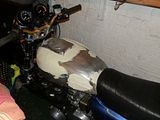
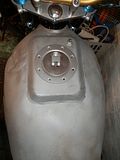
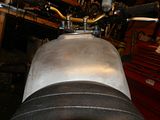
Picked up my tank this week, I knew it was badly damaged under all the body filler, the guys at Yorvik Engineering stuck it in their tank of acid, I then used a blow torch and wire brush to remove all the final bits.
Another trip over to the idustrial estate had Baz weld in a raised portion with a fitting for the quick release aerotype flush cap.
It is probably better I chop up this damaged tank as it would be sacrilage to cut into a good straight one. This tank is at least very solid in that there was no rust holes.
I just need to go over with bodyfiller now to make it presentable, the dent on the left was at least 1" thick with filler, have lifted it somewhat,but the metal will of stretched, so thats all I will do .
Image

Image

I had been looking for an ignition switch and seat lock with matching key and finally found one in the US. It is in good order, but the key a little bent so getting a KZ650 site member to cut me a couple of spares.
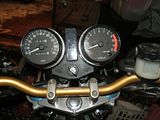
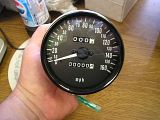
I have cut out the foams for the clock mounts and just need to purchase a set of new aftermarket clocks, 160mph speedo and the electronic type tacho.
Image

Image


Gave the tank the full POR15 treatment which worked really well (I used the product on my std 650 and like it). Busy with the filler next week.

User avatar
zed1015
Hardcore
Hardcore
Posts: 4013
Joined: 2nd Nov 2005
Location: Somewhere between Scunny and Goole.

#167 PostAuthor: zed1015 » Fri Jan 11, 2013 10:38 pm

Project is really cooking now :up

Is that filler mount a re-incarnated baking tray by any chance ? :)

User avatar
j.wilson
100Club
100Club
Posts: 213
Joined: 23rd Jul 2011
Location: wimborne

#168 PostAuthor: j.wilson » Fri Jan 11, 2013 10:48 pm

Good work, cracking result.

Keep pushing on, this sort of project can turn into an emotional roller coaster as project fatigue sets in.
z650/1400 bonneville hybrid.

Crofty
Custard Cream
Custard Cream
Posts: 887
Joined: 18th Nov 2009
Location: York

#169 PostAuthor: Crofty » Tue Jan 15, 2013 7:55 pm

Know what you mean, not requiring any emotional support yet, but seem's to be always on my mind of late.
Ordered the clocks and mounting kit today, should be able to get them mounted by the weekend. I had hoped to get on with filling the dents on the tank, but its too bloody cold at the moment, Mr's C would go off on one if I started doing it in the house, she complained about the petrol tank sealer smell last week. :lol:

Crofty
Custard Cream
Custard Cream
Posts: 887
Joined: 18th Nov 2009
Location: York

#170 PostAuthor: Crofty » Tue Jan 22, 2013 5:35 pm

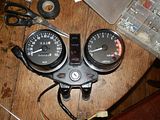
Hey Rob, I thought it looked like a baking tray too. I have been down with man flu, so not much done, though I did get clocks from Z Power and two keys made for the original type ignition and seat lock. Just need to strip down the assy and rebuild after attention to a loose wire and the mods required to make the new clocks fit.
Plus made a start filling the dents.
Image

Image
Last edited by Crofty on Wed Jan 23, 2013 5:07 pm, edited 2 times in total.

Crofty
Custard Cream
Custard Cream
Posts: 887
Joined: 18th Nov 2009
Location: York

#171 PostAuthor: Crofty » Wed Jan 23, 2013 5:02 pm

Have been at the clocks again and barring one solder repair I had to do an earth wire on an illumination socket, the rest went easily. Managed to squeeze the original illumination bulb holders into the aftermarket speedo and tacho holes (slightly smaller than oe).
I had to repaint over the modified bits where I relieved for the speedo and tacho after getting the drill and file in there, then glued on some foams I made, before bolting them all up, sure is tight with all those wires in there.

Image
The finished clock assembly, the extra 3 wires that can be seen are from the electronic tacho.

dixiethedog
Custard Cream
Custard Cream
Posts: 798
Joined: 14th Feb 2009
Location: New Hartley, Newcastle-ish

#172 PostAuthor: dixiethedog » Mon Feb 11, 2013 1:03 pm

Nice project Crofty. :D Thanks for the welcome on that other site. :lol:
Every silver lining has a cloud...

dixiethedog
Custard Cream
Custard Cream
Posts: 798
Joined: 14th Feb 2009
Location: New Hartley, Newcastle-ish

#173 PostAuthor: dixiethedog » Mon Feb 11, 2013 5:19 pm

After having a bit of a look around the 650 site,Ive noticed a lot of people are going for big bore 650 engine's. Im very much for the sleeper look,but would it not have been easier to simply slot a thou or eleven motor in?? Or even at a push a gpz750 engine? Im not asking the question in any negative sense,im just curious why you've taken the hard (in my mind)option? :lol: My mate has just done a gpz11 engine conversion in a 650 frame with minimal frame engine mounting mods,so I know big engines fit. Im a bit of a traitor with my engine choices for my upcoming zed project as I fancy either a 100-ish hp gsxr 750 engine or a 115-125-ish hp yam fj1200 engine.
I think a nice 810 conversion will probably be great though in the right hands. :D
Mind you,ive an unloved gpz750uni trac hiding away in a garage that I may pull the motor and leccy's from. :D So I might end up with a 750 z650?
Every silver lining has a cloud...

Crofty
Custard Cream
Custard Cream
Posts: 887
Joined: 18th Nov 2009
Location: York

#174 PostAuthor: Crofty » Mon Feb 11, 2013 8:07 pm

Hi Dixie, it sorta happened, I had a set of late 650 cases which take the 750 top end without mods and the other bits found me, even the cams were donated free by GPRD for helping strip and rebuidl one of his 650s. The pistons were cheap on oldskool performance, smoothbores were reasonable price off a site member, the only stuff I paid a lot for was the APE parts, studs, nuts, guides, valve springs, valve buckets, clutch mod, valve seals.
It would'nt be a 650 anymore, so why not buy a 900/1000/11000 to start with?
Big Green Bus informed me the 810 conversion with a set of flatslides go really well anyway, I'm hoping to be pleased with the result later this year.

http://www.oldskoolperformance.com/foru ... aki#p28299
interesting reading about the smaller conversion to 720cc

User avatar
750steve
100Club
100Club
Posts: 411
Joined: 13th Feb 2012
Location: N Ireland

#175 PostAuthor: 750steve » Mon Feb 11, 2013 9:07 pm

Yup, thats my next move, a budget performance 'sleeper' 650........more fun messing with internals!! Z650 engine, 750 barrels & pistons, GPz750 Cams & electronic ignition. 750 Zeph front & back end. Sorted! lol


Mind you a GPz11 big bore could be fun in the 650 frame too!

dixiethedog
Custard Cream
Custard Cream
Posts: 798
Joined: 14th Feb 2009
Location: New Hartley, Newcastle-ish

#176 PostAuthor: dixiethedog » Tue Feb 12, 2013 5:38 pm

You'll have a fun bike,with new internals that you know are good,so Im sure it'll be great.
Im not interested in doing engine work myself,so maybe thats why i shy away from such engine projects my self. I can do engine work,when I break them.
Ive just bought myself a complete draw thru turbo kit for my bike,but will leave the engine standard. I might change the oil and plugs. :lol: When I have a blow up,then the spanners will come out,but I wont enjoy the experience!
I have respect for anybody willing to pull engines to bits and then put them back together!!
I'll continue watching with interest.
Respect! :D
Every silver lining has a cloud...

Crofty
Custard Cream
Custard Cream
Posts: 887
Joined: 18th Nov 2009
Location: York

#177 PostAuthor: Crofty » Thu Mar 07, 2013 4:03 pm

Been cleaning and polishing the headlamp brackets I made and still rubbing the tank down whenever it gets vaguely warm.

More progress with the front brakes, I picked up the freshly powdercoated front calipers this morning.
Rebuilt them when I got them home, once I found out what torque the bolts needed to go.
Have to get some front hoses made up now.

Image

Crofty
Custard Cream
Custard Cream
Posts: 887
Joined: 18th Nov 2009
Location: York

#178 PostAuthor: Crofty » Sun Mar 10, 2013 1:09 pm

Been on with the electrics today, my least favourite job.
Using GPZ750 handlebar switches.
So far have got oil pressure light working on dash, starter switch and kill switch working, 3 phase rectifier wired in and identified the headlamp wires on the rh switch. Also stripped back the outer rh sleeve and removed the GPZ750 brake lamp switch wires, these will run from switch into headlamp and not under the tank.
Jumped in the air at one point when I knelt on the soldering iron.
Lamps in clocks seem to work as well, if I supply a live feed , but they are all std 650 into 650 loom, its only the switches and rectifier that differ much from std 650. At this stage there will be no blinkers, but as the wires are all there, will not be a big job to wire in later like I did with the F1.
Get the headlamp shell back from powdercoating tomorrow, so can start stuffing wires inside

Royalratch
100Club
100Club
Posts: 345
Joined: 3rd Jul 2009
Location: London

#179 PostAuthor: Royalratch » Mon Mar 11, 2013 10:09 pm

Bump of support.

Attack Crofty attack!

Crofty
Custard Cream
Custard Cream
Posts: 887
Joined: 18th Nov 2009
Location: York

#180 PostAuthor: Crofty » Wed Mar 13, 2013 11:23 am

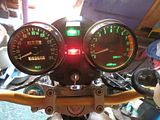
Thanks Ratch, more progress made with the wiring, now got all dash warning lights, clock lights, horn, pass switch, front and rear brake lamp switches, park, dip and main beams, rear lights, 3 phase alternator wired in, starter and kill switch working.
The only remaining wiring to make is the coil harness for the dyna coils and connect in the dyna ignition.
I usually don't like wiringTBH I didn't dare try to other than simple replacing a terminal or cleaning the contacts, but this turned out to be fairly straightforward, though the only wiring diagram online for the GPZ750 switches was wrong with a lot of the colours, so I had to take the switches off the handlebars and visually check what colours went where.
Then it was just a case of rigging a test bulb and checking what was live with ignition on etc and following the wires.
If anyone ever does this I can let them know what colours go together.
I would say most of them were original, but for the lighting ones and kill switch.
Just remembered I will have to wire in the electronic tacho too. Might go out and do that later if the sun stays out.

Image

Image


Return to “Projects”

Who is online

Users browsing this forum: No registered users and 25 guests