Hello Guest User,
Please feel free to have a look around the forum but be aware that as an unregistered guest you can't see all of it and you can't post.
To access these 'Registered Users Only' areas simply register and login.
Please feel free to have a look around the forum but be aware that as an unregistered guest you can't see all of it and you can't post.
To access these 'Registered Users Only' areas simply register and login.
Z1000A1 Refresher
Moderators: paul doran, Taffus, KeithZ1R, chrisu


well i think you are going about it the correct way from what i can see Mark ,debbens will put you right with good advice as regards the head .Yes there are some great brewerys around that area ,i used to deliver to some of them ,with a few samples to bring home 

zedsrus:"i don't know man ,i just got here myself !!"


ollie wrote:well i think you are going about it the correct way from what i can see Mark ,debbens will put you right with good advice as regards the head .Yes there are some great brewerys around that area ,i used to deliver to some of them ,with a few samples to bring home
Debben Performance is round the back of Ringwood Brewery
adrianhorsfield@live.co.uk
Sunny Bournemouth. Dorset. UK.
Sunny Bournemouth. Dorset. UK.

-
Mark Stratton

- 100Club

- Posts: 483
- Joined: 16th Feb 2009
- Location: Southampton
Right, due to work and family ties project has just about ground to a halt. I have managed to get the bottom end split and all the cases, barrels, head etc off for vapour blasting (couldn't face doing it all by hand with Scotchbrite and Autosolv).
Patient hoist that I saved from a skip and modified to suit the garage.

With some webbing straps closely tied onto the bottom end it is fairly simple to lift from the frame.

....and then just simply power traverse to the bench. I have tesed the hoist and track to 250kgs so its more than capable of lifting one of these lightweight engines

......split the cases using the M8 bolts on the threaded bosses on the front of the cases

.....crank was rebuilt and welded by Debbens last time the cases were apart so no need to check that. All gear clusters stripped cleaned and checked. All look okay.
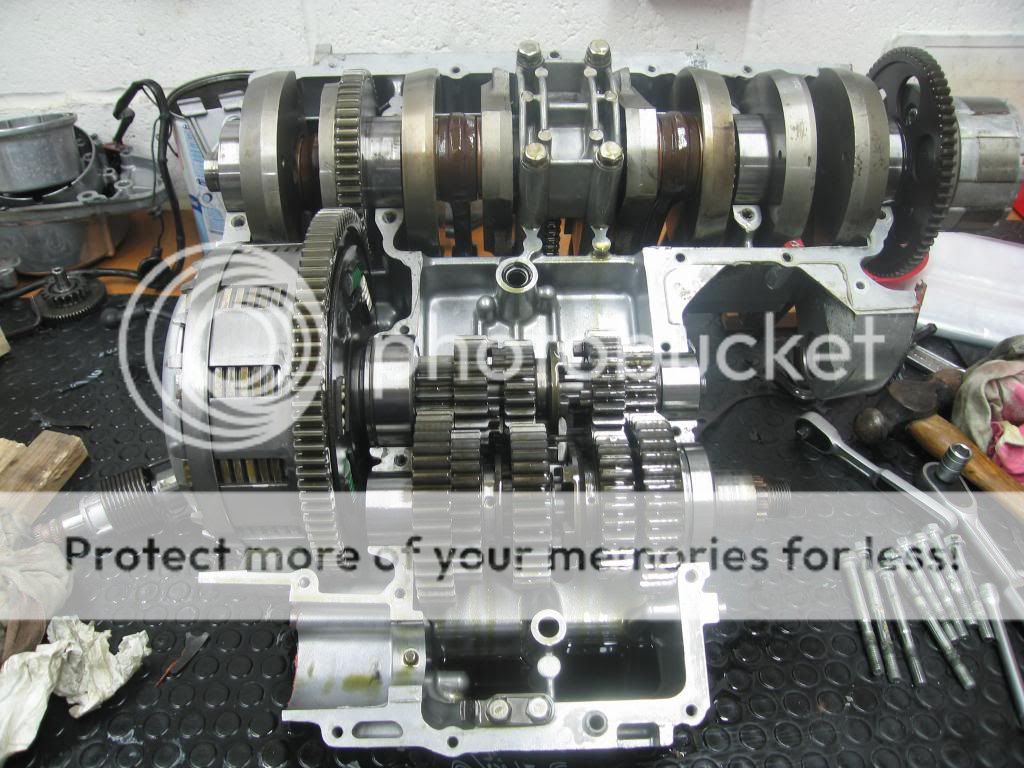
....only issue that I have noticed is with the clutch basket. When I checked the basket using a dial gauge for trueness (if there is such a word!) I found that there is approximately 1.1mm runout on the outside ring of the basket however the inside edge of the basket closest to the crank gear is fine with only 0.10mm runout. My question is .....is this normal for the basket not to be perfectly round or is this something that needs to be addressed before being refitted?
Has anyone else noticed this on their clutch baskets and would this account for vibration at about 3500rpm

Would the runout on the clutch basket cause premature wear on the clutch shaft bearing?
Just found a local company no more than 2 miles from me that does vapour, bead & shot blasting and powder coating. At £120 for the lot couldn't resist. Saved an awfull lot of skinned fingers


I'm quite impressed with the finish although it is not as good as a Steve Smethurst finish but at a third of the cost it will more than do.
Next job has been to ensure that all the oilways are completely clear of any blast media so I have used bottle brushes and rags attached to wire to pull through all the oilways and then a good blast of compressed air to make sure.
Patient hoist that I saved from a skip and modified to suit the garage.
With some webbing straps closely tied onto the bottom end it is fairly simple to lift from the frame.
....and then just simply power traverse to the bench. I have tesed the hoist and track to 250kgs so its more than capable of lifting one of these lightweight engines
......split the cases using the M8 bolts on the threaded bosses on the front of the cases
.....crank was rebuilt and welded by Debbens last time the cases were apart so no need to check that. All gear clusters stripped cleaned and checked. All look okay.
....only issue that I have noticed is with the clutch basket. When I checked the basket using a dial gauge for trueness (if there is such a word!) I found that there is approximately 1.1mm runout on the outside ring of the basket however the inside edge of the basket closest to the crank gear is fine with only 0.10mm runout. My question is .....is this normal for the basket not to be perfectly round or is this something that needs to be addressed before being refitted?
Has anyone else noticed this on their clutch baskets and would this account for vibration at about 3500rpm
Would the runout on the clutch basket cause premature wear on the clutch shaft bearing?
Just found a local company no more than 2 miles from me that does vapour, bead & shot blasting and powder coating. At £120 for the lot couldn't resist. Saved an awfull lot of skinned fingers
I'm quite impressed with the finish although it is not as good as a Steve Smethurst finish but at a third of the cost it will more than do.
Next job has been to ensure that all the oilways are completely clear of any blast media so I have used bottle brushes and rags attached to wire to pull through all the oilways and then a good blast of compressed air to make sure.
Z1000A1 Refresher
Thats a nice Z40 picture on your wall.
-
Mark Stratton
- 100Club
- Posts: 483
- Joined: 16th Feb 2009
- Location: Southampton
Re: Z1000A1 Refresher
HARRY4448 wrote:Thats a nice Z40 picture on your wall.
Harry that is the Z40 poster. i just put it in a cheap clip frame so it didn't get covered in shit. If you look at the photo of the bike at the start and then photo 7 you'll see it has slipped down in the frame
-
Mark Stratton
- 100Club
- Posts: 483
- Joined: 16th Feb 2009
- Location: Southampton
Not much to report. Followed zed1015 idea on cylinder studs that take a good soaking and normally go rusty within 3 seconds of seeing rain. First three coats with some Smoothrite then once dried on with the heatshrink.
Brilliant idea Rob
 [/img]
The two M6 head bolt threads into the barrels felt pretty risky last time the head went on so I decided it was time to fit a thread insert to give a bit more meat. As with the cam chain tensioner which has been a serial leaker for ages so that needed the same treatment.
Borrowed pillar drill from work from so I could make sure of drilling the hole straight although this drill is a bit worn but definitely better than my wonky eye and a battery drill waving around in the air!


Using the trusty Helicoil set which I know is out performed by the Timeserts but I've already got the Helicoil set in my toolbox and as we have just found out that Mrs S is being made redundant in July every saved penny counts.
The only problem that I have come across with the Helicoil's is that the adjustable collar on the insertion tool doesn't fit in some counterbored holes, just like the ones on the barrels.
My solution was to turn some brass down to suit the counterbored hole and the insertion tool. Simples


Thought that I was done on the barrels untill I was running a tap through the inserts to make sure that they were clear of all the crap and on the last one the tap locked solid on the way out.
Half an hour of releasing oil, heat and coaxing it just would not budge either way untill that horrible little crack, and yep one broken tap To say the air turned blue is an understatement of the largest proportion.
I had hoped that the tap would have shattered but no it had snapped level with the top of the thread insert down in the counterbored hole. As it was a spiral fluted tap there was no way that it could easily retreived. Gutted!
Lots of phoning around on Monday got me onto a small precision engineering shop on the outskirts of Southampton (Newman Stallard 02380 864291). Gave them a call and spoke to a really helpfull guy called Tom. Very knowledgable bloke who builds his own frames etc and is heavily into bikes/bike racing. Also has spark erosion gear in his garage at home and for £25 eroded the tap clean out of the hole without any issues
I've just got to sort the issue with the clutch basket now and I can start to rebuild the bottom end. My finish date of the end of April in readiness for the Ace Cafe is totally shattered now but I will get there in the end I suppose.
Brilliant idea Rob
 [/img]
The two M6 head bolt threads into the barrels felt pretty risky last time the head went on so I decided it was time to fit a thread insert to give a bit more meat. As with the cam chain tensioner which has been a serial leaker for ages so that needed the same treatment.
Borrowed pillar drill from work from so I could make sure of drilling the hole straight although this drill is a bit worn but definitely better than my wonky eye and a battery drill waving around in the air!


Using the trusty Helicoil set which I know is out performed by the Timeserts but I've already got the Helicoil set in my toolbox and as we have just found out that Mrs S is being made redundant in July every saved penny counts.
The only problem that I have come across with the Helicoil's is that the adjustable collar on the insertion tool doesn't fit in some counterbored holes, just like the ones on the barrels.
My solution was to turn some brass down to suit the counterbored hole and the insertion tool. Simples


Thought that I was done on the barrels untill I was running a tap through the inserts to make sure that they were clear of all the crap and on the last one the tap locked solid on the way out.
Half an hour of releasing oil, heat and coaxing it just would not budge either way untill that horrible little crack, and yep one broken tap
I had hoped that the tap would have shattered but no it had snapped level with the top of the thread insert down in the counterbored hole. As it was a spiral fluted tap there was no way that it could easily retreived. Gutted!
Lots of phoning around on Monday got me onto a small precision engineering shop on the outskirts of Southampton (Newman Stallard 02380 864291). Gave them a call and spoke to a really helpfull guy called Tom. Very knowledgable bloke who builds his own frames etc and is heavily into bikes/bike racing. Also has spark erosion gear in his garage at home and for £25 eroded the tap clean out of the hole without any issues
I've just got to sort the issue with the clutch basket now and I can start to rebuild the bottom end. My finish date of the end of April in readiness for the Ace Cafe is totally shattered now but I will get there in the end I suppose.
-
Mark Stratton
- 100Club
- Posts: 483
- Joined: 16th Feb 2009
- Location: Southampton
Enlisted the help of my 11 year old son over the weekend. He is showing keen interest in using his hands and working on the bike so I thought it best to encourage him as much as I can especially if it gets him away from the computer games. Perhaps I should have got him to take the photo's as I managed to f**k that up by taking them in the wrong format so they wouldn't view on Photobucket
We completed the strip of the frame and gave it a good degrease and polish although it wasn't that bad to be honest.
The rear shocks have seen better days and really need a full cosmetic restoration. The springs definitely need to be re-chromed as the rust has really taken hold.
They don't look to bad in the photo but look much worse up close.

I purchsed a set of secondhand Koni Dial-A-Ride's from evilbay a few years ago and have never got around to fitting them. I dug them out from the box that they had been languishing in and gave them the once over with some Autosolve and Harley wax on the springs and I must admit they look quite good, well alot better than the rusty standard ones.


Going to try and get the bottom end built up next so I can get it back into the frame and off of the bench. Finding space a bit of a premiun at the moment even though I'm trying to work as tidy as possible.
Who is online
Users browsing this forum: No registered users and 48 guests